Computer Graphics Survey
Animation Visuals Timeline
Using Director 7 on MacOS Computers
| previous handout |
ACG Home |
Instructor Home |
Class Home |
list of tutorials |
next handout |
Before beginning the project
Read the
information that pertains specifically to the way the ACG Lab operates.
This section of the directions may not apply if you work on the project elsewhere.
- To complete the visuals of our animation project, we take the pictures (cast members) created and/or imported in the previous session, and arrange them on a timeline (called the Score).
- We again focus our use of Director to its animation features, but we also add an element of programming from the interactive authoring features:
- First we verify the initial setup of the program.
- Several objects can then be arranged on the Stage to establish their motion path.
- Next, we adjust the placement on the timeline of a background picture. This element remains in the same position on the stage throughout the animation.
- Finally, we write a brief script using Lingo to make sure the animation continues to play indefinitely once it is displayed in our web page.
- At the end of the tutorial, your Director file will contain all the visual information necessary for the animation.
- Save this file--in later tutorials we will add sound to go with the images.
- We are also postponing the conversion to Shockwave format until after the soundtrack is included. For the time being, therefore, our animation is still not ready to be posted on the web.
return to top
- Use the Control Strip to check that the computer display is set to 256 colors.
- Reset Director to factory defaults by trashing the file 'Director 7.0 Preferences' (it's in the 'Preferences' folder inside the 'System Folder' on the startup disk).
- Find and launch Director, then use File-->Open to retrieve the animation file you started to work on last
time.
- Make sure the windows required for this stage of the project are open (use the Window menu if necessary to open them):
- Stage (where the animation will be displayed)
- Internal Cast

- Control Panel

- Score
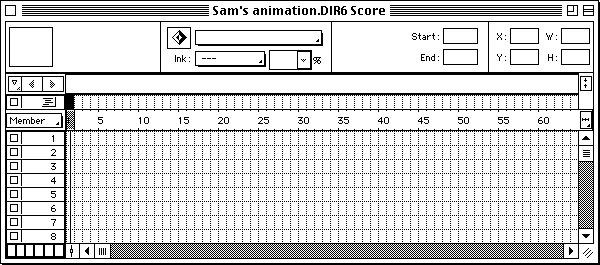
- Given the small size of our stage, we'll turn off the display of additional information by unchecking the View-->Sprite Overlay-->Show Info command. This should reduce clutter somewhat.
- Place your background image, so it can be used as a reference to position other elements.
- Click on the thumbnail of the background cast member in the Cast window, and drag it to the first cell of the Score--the intersection of frame (column) 1 and channel (row) 1. This creates a sprite (a visual element which is actually performing in the animation--instead of idling in the Cast).
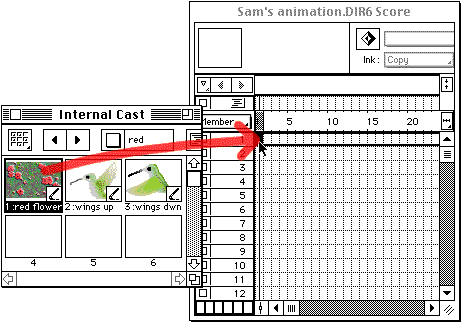
- Dragging to the Score will automatically center the cast member's image on the Stage, which is generally appropriate for the background image.
- As always, make sure to save your work as you go along, using the File-->Save command.
return to top
- Make sure frame 1 is still selected in the Score.
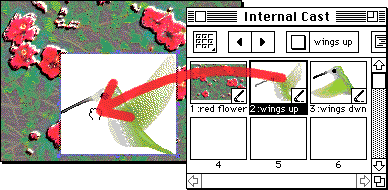
- Option-drag the first in the sequence of pictures of your animated character from the Cast to the Stage. Option-dragging to the Stage will add a sprite to the movie for a single frame only. The Score window should immediately show an entry to reflect this.
- To eliminate the white box around the picture of the animated character, make sure the sprite is still selected, then change the Ink menu from 'Copy' to 'Background Transparent' (the Ink menu is in the top margin of the Score window).
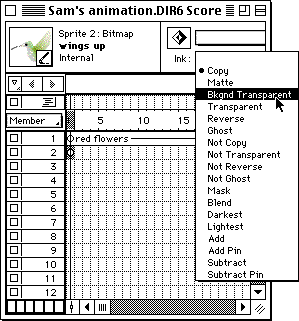
- 'Background Transparent' will make all white pixels in the cast member transparent: if this is not appropriate for your picture, try 'Matte' instead. 'Matte' will only turn transparent the white pixels on the margins of the cast member.
- Most other inks can be used for special effects, but many of them will slow down the animation.
- Continue to drag pictures of the animated character to the stage to
indicate the path of its motion (don't forget to change the Ink setting as appropriate).
- For a looping animation (one that will keep playing indefinitely), you would want the first and last pictures to be located in the same part of the frame.
- In addition, make sure to alternate the pictures with the different positions of the animated character (in the example below, the hummingbird with wings raised alternates with the hummingbird with wings lowered).
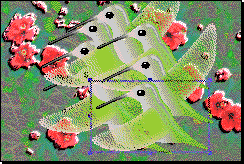
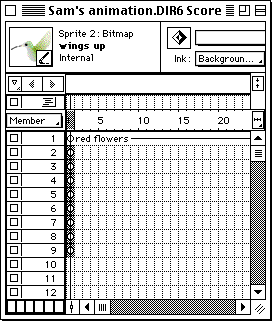
- In the Score, you will find a column of entries referring to the cast members you just dragged.
- Make sure the pop-up menu in the left margin of the window is set to Member, then check that the cast member numbers alternate properly. A shortcut to do this is to simply place the pointer on top of a Score entry, and its name will be displayed. In the example, castmember 2 (wings up) alternates with 3 (wings down).
- Click on the first entry for the animated character, and shift-click on the last entry (make sure you do notselect the first channel, used for the background).
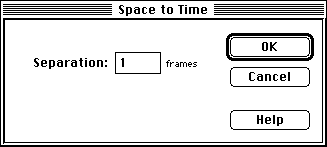
- Use the Modify-->Space to Time command. In the dialog, leave the number of frames of Separation set to 1, then click OK.
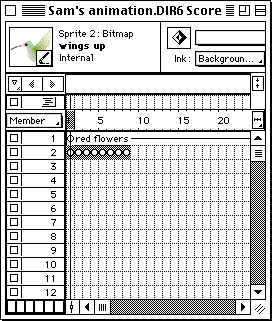
- The pictures of the animated character are now arranged in consecutive frames. On the Stage, the path of the character's motion is represented by a series of connected dots. If you play the animation (Control-->Play), you will see the character move.
- To better judge the effectiveness of the animation, you may want it to play back repeatedly. Director continues to play the animation indefinitely if Loop Playback is checked in the Control menu. Use Control-->Stop when done watching the animation.
- When the animation is stopped the animated character's path is again displayed. You can adjust the motion by dragging the connected dots of the path using the arrow pointer.
- If the pointer does not change to an arrow when it is over the Stage, display the Tool Palette using the Window menu and choose the arrow tool.
- If you don't see the motion path after stopping playback, make sure that the animated character is selected (click on it with the arrow pointer, either in the Score or in the Stage window).
- In most cases, however, the duration of the background will not match the length of the animation. We will fix this problem in the following steps.
return to top
- The duration of the background was set to some default number of frames (the factory setting is 28). It needs to be adjusted so it will stop when all other animation(s) stop (the end of the last entry in the Score sets the end for the entire movie as well).
- Click on the entry in the first channel (representing your background image) to select it. Make sure you can see where it ends (you may have to scroll or enlarge the Score window).
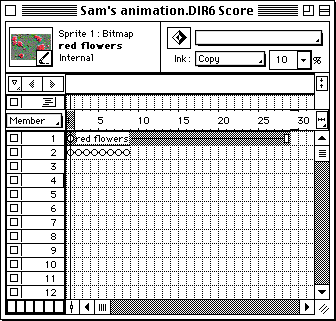
- Click on the handle (the small white box at the end of the selection), and drag it to the same frame where the character animation(s) end.
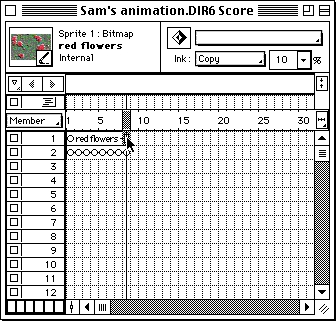
- If you play back the movie now, you will see that it ends (and restarts) just as the character animation ends.
return to top
- While you can force the animation to repeat with Control-->Loop Playback (as mentioned earlier), this setting won't be retained in the final Shockwave file. Programming (also known as scripting) gets around this problem.
- A script is created by typing appropriate instructions in a special text window called the Script window.
- Double-click on the intersection of the last frame of the animation and the Script channel (the one above the 'ruler' with the frame numbers). This will open the Script window.
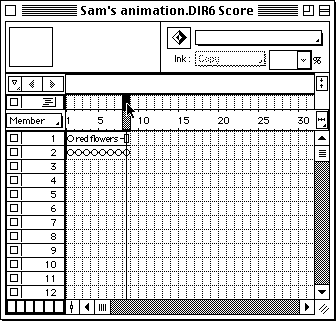
- In the Script window you will see some text already entered
for you. The insertion bar is flashing at the beginning of the second, blank line, sandwiched between on exitFrame and end. Without moving the insertion point, type:
go to frame 1
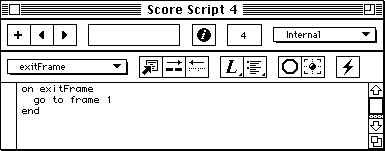
- When done, press the Enter key (on the keypad, not the Return key) to close the Script window. Notice that a new item representing the script has been added to the Internal Cast window.
- Inclusive of the statements already in the window, this is a very brief program which causes playback to resume from frame 1 whenever the last frame completes.
- If the program was entered correctly (exact spelling is absolutely essential), the animation will continue indefinitely whenever played, regardless of whether Control-->Loop Playback is checked or not. Again, use Control-->Stop when done.
- You have now completed the visuals for your animation. In the next session we will set Director and the completed visuals aside to focus on the soundtrack. Later we'll return to Director to combine sounds and visuals.
return to top
Notes
- Lingo is the language used to write programs as part of Director documents. The scope of these programs ranges from simple playback control (as in our loop example) to complex responses to viewer interaction.
- Lingo programs are called scripts (and Lingo a scripting language) to highlight differences from general-purpose programming languages. Another terminology for this difference distinguishes between higher-level languages (such as Lingo), and lower-level languages (such as Java, Pascal, C and--further down on this scale--Assembly Language).
- In general, a high-level language tries to conform more closely to the way the programmer expresses him/herself, while a low-level language is closer to the actual code (Machine Language) used by the computer processor.
- The biggest trade-off between high- and low-level languages is ease of programming versus performance.
- A high-level language can achieve in a few short statements effects that would require many complicated constructs in low-level languages.
- A low-level language affords enough control to optimize the program for fast execution, small size, or both.
- Other trade-offs may involve generality (most high-level languages are effective only for specific uses, like interactive multimedia); availability (scripting languages are often tied to application software like Director, and/or are confined to some types of computers); stability (general-purpose low-level languages are regulated by international standards and evolve gradually).
- Other scripting languages that a multimedia author might encounter are HyperTalk (tied to the Macintosh multimedia program HyperCard), and JavaScript (implemented in web browsers to allow greater interaction with web pages).
- There are also a number of system-level scripting languages (such as AppleScript and Frontier on the Mac, the various Unix shells, and Perl across platforms) which are used to control combinations of other programs. These languages may be important to Internet-based multimedia projects, since they can automate the creation of web pages and the operation of web sites.
return
- The score is arranged in vertical columns or frames (sequential moments in time) and horizontal rows or channels.
- The channels in turn are divided into numbered image channels which represent the layering of images in the animation (with number 1 appearing behind all others); and special-purpose channels for such things as sounds and timing commands (these channels are indicated by icons).
- As visual items are placed in the Score, they also appear on the Stage (the window showing the actual animation). Stage and Score are just two different ways to look at the same animation layout, and each is automatically updated when a change is made to the other.
return
- The spacing of the images of an animated object determines the quality of the motion.
- Assuming the playback rate remains the same, wider spacing between images determines faster motion.
- The playback rate (expressed in frames per second, or fps) can only be adjusted within narrow limits. A very high frame rate cannot be sustained by slower computers, and a very low frame rate makes the animation appear jerky.
- If the spacing changes, the speed of the motion will change as well. This can be used to impart a more realistic appearance to the action.
- An object which suddenly sets off at a constant speed feels very unnatural. A better approach is to speed up the motion gradually by progressively increasing the spacing between pictures. In animation jargon this is known as ease in.
- Likewise, slowing down until coming to a stop (ease out) is more effective than a moving object abruptly becoming still.
- The rate of speed change suggests to the viewer how heavy the object is. Lighter items pick up and loose speed more quickly.
return
- A program is a list of actions to be performed by the computer.
- The program runs (or executes) in response to an event registered by the computer.
- For instance, the program Director runs in response to a double-click on its icon. The simple program included in this tutorial runs whenever the end of the animation is reached.
- The order in which the various actions are taken, and the specifics of their operation, may change at runtime (e.g., each time the program is fed through the computer).
- This flexibility lets a program adapt to different conditions without rewrites, and is essential for interactivity.
return
Information specific to the ACG Lab
- On ACG Lab computers, the program Director is on the startup drive, inside the Multimedia folder.
- After completing this step of the project, make sure to copy your updated Director file to your Zip disks. This file will be needed again for subsequent steps of the project.
- If you wish to look at Director animations elsewhere on the Internet, make sure to use a browser configured with the required plugin. Links to many such examples are available on the Macromedia, Inc. Web site. A number of these samples include interactive hotspots you can click to change the animation. Interactivity is primarily implemented through Lingo programming.
- The Art Computer Graphics program of Fullerton College offers two classes which cover Lingo and other Director topics in greater detail, ACG162-Intro to Multimedia for Macintosh and ACG164-Multimedia Authoring. Look them up in the ACG Class Schedule.
return
| previous handout |
return to top |
next handout |
|
This document originally at <http://acg2.fullcoll.edu/FACULTY/CORSI/LEARN/OVERVIEW/OV080/MAC1EN_P.HTM>
|
Copyright 1998-2000 by Sandro Corsi.
Last modified 2000-03-08.
|
SaneDraw home
|