Computer Graphics Survey
Editing Scanned Images
Using Photoshop 5.0 on MacOS Computers
|
previous handout |
ACG Home |
Instructor Home |
Class Home |
list of tutorials |
next handout |
Before beginning the project
Read the
information that pertains specifically to the way the ACG Lab operates.
These directions may not apply if you work on the project elsewhere.
- Photoshop is the most widely used tool for editing raster, or bitmapped, or paint images, such as the pictures you scanned and which were described in the previous tutorial.

- The capabilities of Photoshop are extremely numerous, and this beginner tutorial won't attempt to cover them all. After learning some basic techniques, you can choose to work with your scanned image using any combination of these features:
- Regardless of how you choose to work on your scan, once the picture is complete you must convert it to a web-compatible format, then modify the HTML for your web page to call up the image.
return to top
- Resetting the program to factory defaults: before starting up Photoshop, it is recommended that you trash the file 'Adobe Photoshop 5 Prefs', found in the 'Adobe Photoshop Settings' folder inside the Photoshop application folder.
- After resetting, Photoshop will display the Color Management Assistant. Just click 'Cancel' to dismiss the dialog.
- Opening scanned files: double-clicking the icon of your scanned image file will generally not work, since the computer will look for the scanner program to open the picture. Instead, drag the picture file icon and drop it on Photoshop's icon.
- Recovering from mistakes: like many other programs, Edit-->Undo will recover from the last editing operation only. You can retrace your steps further back using File-->Revert (provided you had previously saved a satisfactory version of your work in progress).
- Photoshop does provide the equivalent of additional Undo steps through the History palette (if not visible, use Window-->Show History). The palette lists the last several operations with the name of the tool used--simply click on an entry to return to the way the document was when that tool was used.
- Since we won't be able to cover this feature in detail in the time available, make sure to monitor the palette closely as you work--so that you know which operations can be undone.
- Changing your view of the document: to zoom in and see the document up close, use the magnifier tool and click in the document. Option-click with the same tool to zoom out.
- Use the scroll bars to see parts of the document beyond the window's edges. As an alternative, use the grabber hand tool and drag in the document window.
- Selecting parts of the image: before most commands can be used, you must have selected the part(s) of the image that you want to work on.
- To select an irregular shape, trace its outline using the lasso tool.

- For irregular shapes with straight edges, click and hold on the lasso icon in the toolbox to reveal the polygon selection tool.

- For a box-shaped selection, use the marquee tool.

- To select an oval or circular shape, click and hold on the marquee icon in the toolbox to reveal the elliptical selection tool.

- To turn off the current selection use the command Select-->Deselect. Also, creating a new selection turns off the current selection.
- To add to the current selection, make an additional selection while holding down the Shift key.
- To subtract from the current selection, use any selection tool with the Option key down.
- Photoshop also provides more sophisticated selection tools (see the online documentation), but for our simple project these will suffice.
return to top
- To remove the background of your image (so that the color of the web page--or another image--can show through):
- Find out what type of image you have (in the Mode submenu of the Image menu). If the mode is 'Bitmap', change it to 'Greyscale'; if it is 'Indexed Color', change it to 'RGB Color'; other modes can be left as they are.
- Double-click the name ('Background') of the only item listed in the Layers palette (if not visible, use Window-->Show Layers). In the dialog that appears, click 'OK' .

- With 'Layer 0' highlighted in the Layers palette, make sure that 'Preserve Transparency' (in the same palette) is not checked.
- Choose the Eraser tool from the toolbox.

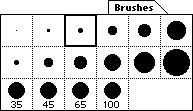
- Pick the size and shape of the eraser from the Brushes palette (if not visible, use Window-->Show Brushes).
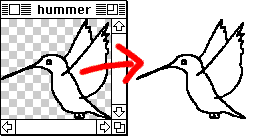
- Use the Eraser tool to remove the background. The grey checkerboard which is revealed indicates the parts of the image which will be transparent in the final output.
- To enlarge your work space (this may be useful later to make room for distortions or additional elements):
- Image-->Canvas Size. Change the Width and Height units to pixels, and enter the new size (don't overdo it, remember that we want to keep the file size small).
- The position of the gray box in the grid at the bottom of the dialog indicates the position of the current image in the new workspace. Click to reposition it as needed.
- Click 'OK'
- Note that this command does not change the size of the picture elements themselves--to do so you have to use Image Size (see below). Canvas Size only changes the amount of space around the picture elements.
- To magnify or shrink the elements in your image (shrinking may be necessary to bring the file size down):
- Image-->Image Size. Make sure 'Constrain Proportions' and 'Resample Image' are checked (and that 'Bicubic' is selected in the 'Resample Image' pop-up menu). Change either the 'Width' or 'Height' (the other will adjust proportionally) in the 'Pixel Dimensions' box (the content of the 'Print Size' box can be ignored for this project).
- Keep an eye on the new size in K so it doesn't get too large. Click OK when done.
- Keep in mind that once you shrink the image, some of its detail is lost and cannot be recovered by re-magnifying.
- If you are not sure about what level of detail you may need in your image, click 'Cancel' now. Make a backup copy of the picture at the original size (File-->Save a Copy), then go back to the Image Size dialog.
- If you find that you need to magnify the picture by more than 10-15%, you are better off re-scanning, since the enlarged image will look rather out of focus.
- To crop your image (this also may be necessary to reduce file size):
- Choose the Crop tool in the toolbox (revealed by clicking and holding on the Marquee tool)

- Drag a selection box enclosing the part of the picture that you want to keep.
- Drag the small square handles that appear at the corners of the selection to adjust its size. To rotate the image as you crop it, move the pointer outside the selection (it will turn into a curved arrow), then drag.
- To proceed to crop, press the 'Return' key. If you don't want to crop after all, press the 'Escape' key instead.
- Like shrinking, cropping is irreversible (parts of the image are tossed out). Keep a backup copy.
- To combine parts of different pictures:
- Arrange the windows with the pictures side-by-side.
- Make a selection in the starting picture. In the Layers palette, make sure that the correct layer is highlighted--in case you have more than one.
- With the selection tool still active, hold down the Command (Apple) key, and drag the selected portion of the original picture to the window of the destination picture. The selection will be added to the destination document, in a new layer.
- To reposition the new layer and its image content, use the Move tool

- If it is inconvenient to open both pictures at the same time, you can also use the same Edit-->Copy and Edit-->Paste commands that you used for text editing.
- You can duplicate a detail within a picture by dragging its selection while holding down the Option and Command keys. Note that this technique will not automatically create a separate layer--when you deselect, the pixels underneath the selection in the current layer will be wiped out.
return to top
- Choose any of the painting tools in the toolbox: Pencil, Brush, Airbrush, Line (to see the Line tool, click and hold on the Pencil tool icon).

- For most tools, choose an appropriate size and shape from the Brushes palette. For the Line tool, instead, set the Weight (= thickness) in the Options palette (Window-->Show Options)
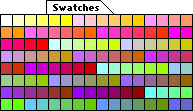
- Choose the color of your tool from the Swatches palette (if not visible, use Window-->Show Swatches)
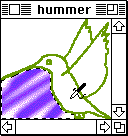
- In most cases, you will want to turn off any selections (Select-->Deselect) before you start painting. When a selection is active, painting tools leave a mark only within the selection. This can be used as a 'frisket' to protect parts of the picture from unintended overpainting.
- Create a new layer: display the Layer palette menu (press and hold on the triangle in the upper-right corner of the palette), choose the 'New Layer' command, optionally enter a name, then click 'OK'
- Drawing on a separate layer protects the scanned image. If you later erase some of your painting, items on other layers won't be affected.
- Make sure the name of the new layer is highlighted in the Layers palette.
- Drag the pointer in the document window to draw.
- Use the Eraser tool to remove any mistakes.
- The eraser tool is primarily used to determine transparency. However, it can also be used to paint with the background color if:
- Either the special item 'Background' (with the name italicized) is available in the Layers palette, and its name is highlighted before using the eraser...
- Or any other layer is selected, and the 'Preserve Transparency' checkbox (in the Layers palette) is checked.
- The background color (shown at the bottom of the toolbox) is initially white, and can be changed by Option-clicking on a color in the Swatches palette.

return to top
- Make a selection (if necessary, check that the correct layer is selected).
- Use any of the commands in the second section (Scale through Perspective) of the Transform submenu of the Edit menu.
- Drag the small square handles that appear at the corners of the selection.
- If happy with the result, press the 'Enter' key; if not, press the 'Escape' key. Note that deselecting will again wipe out underlying pixels--no new layer is automatically created.
- These transformations will also degrade the image, so you do not want to perform them repeatedly. The transformations listed at the bottom of the Transform submenu (Rotate 180° through Flip Vertical) do not cause this problem.
return to top
- Make a selection (if necessary, check that the correct layer is selected).
- Bring up the exposure controls with Image-->Adjust-->Brightness/Contrast. Make sure 'Preview' is checked. Drag the sliders as needed. Click 'OK' when done, or click 'Cancel' to reset.
- Bring up the color controls with Image-->Adjust-->Hue/Saturation. Make sure 'Preview' is checked. Drag the sliders as needed. For a monochrome effect, check 'Colorize'. Click 'OK' when done, or click 'Cancel' to return to the uncorrected state of the document.
return to top
- Make a selection (if necessary, check that the correct layer is selected).
- Use any of the commands in the Filter menu
- Since the purpose and operation of the filters varies widely, the only generally applicable advice is to make a copy of your image before you begin, then proceed to experiment to your heart's content. Keep in mind that many filters will completely destroy your image--that backup copy is really important.
- Most filter commands will bring up a dialog with controls and a preview window. Adjust the sliders and other controls based on what you see in the preview. Some filters will also show you the effect of your adjustments directly in the document window, provided 'Preview' is checked (for large selections and processor-intensive filters, you may want to uncheck this option to speed up operations). Click 'OK' when done, or click 'Cancel' to return to the unfiltered state of the document.
return to top
- First, make sure you have saved the edited file one last time (File-->Save), so you have a good copy without compression artifacts.
- Second, decide on a file format. The two formats readily viewable using most browsers are JPEG and GIF:
- JPEG is generally more appropriate (smaller file size, better image quality) for photographs and other continuous tone images.
- GIF works better for images with large areas of solid color, such as charts, diagrams, logos, etc.
- Note: if you intend to drop the background of your photograph, then you must use GIF, since transparency is currently not supported by the JPEG standard.
- If you did not erase the background to make it transparent (there is no grey checkerboard pattern showing through your image), and your image is continuous tone, use the following steps to convert to a JPEG file:
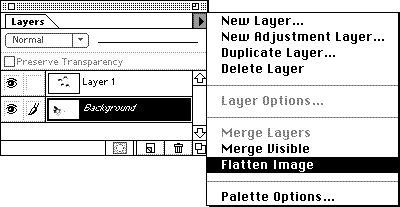
- In the Layer's palette menu, choose the 'Flatten Image' command, if available.
- Make sure that either 'Greyscale' or 'RGB Color' is checked in the Image-->Mode submenu.
- File-->Save As.
- From the 'Format' pop-up menu, select 'JPEG'. If JPEG is greyed out, you have used unallowed features in your image: click 'Cancel', then make sure that you don't have extraneous items in the Layers and Channels palettes:
- The Layers palettes should contain only the italicized 'Background' layer. If not, use the Flatten command mentioned above.
- The Channels palette should contain only the 'RGB' and 'Red', 'Green', and 'Blue' channels. Any additional channels (you may have to scroll down the list to see them) should be removed by dragging their name to the Trash Can button at the bottom of the palette.
- Enter filename with this format: your last name, underscore, your first name's initial, period, the extension 'jpeg' (without quotes, all lowercase). In Sam Sample's case, the filename would be 'sample_s.jpeg' (again, without quotes).
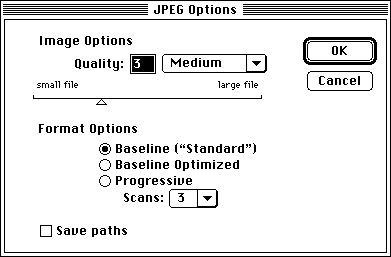
- Click 'Save'. In the JPEG Options dialog, choose 'Medium' image quality, 'Baseline Standard' format. Click OK.
- Select the icon for your JPEG file in the Finder, and use File-->Get Info to check that its size is not much larger than 30K. If it is, go back to Photoshop and repeat the conversion process, cropping/scaling the image and/or choosing a lower image quality setting.
- If you did erase the background to make it transparent and/or your image has solid color fills, use the following steps to convert to a GIF file:
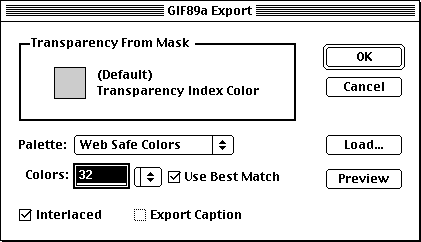
- Check that 'RGB Color' is checked in the Image-->Mode submenu, then File-->Export-->GIF89a Export.
- Click 'Load' and open the file 'Web Safe Colors', containing the cross-platform Netscape colors.
- The default location for the file 'Web Safe Colors' is in the same folder as the Photoshop application, inside 'Goodies:Color Palettes'.
- The name of the color look-up table you loaded will appear selected in the 'Palette' pop-up menu. Turn on the "Use Best Match" checkbox.
- Generally, leave the number of colors as set by the program. You may want to experiment with lower numbers to further reduce file size.
- To see the effect of different color settings, click "Preview".
- Choose a "Transparency Index Color" that matches the background color of the web page. The default color is the standard Netscape grey background.
- This is especially important if the transparent areas have soft edges, since the edges of the image will be blended with the index color.
- The transparency option is disabled if the image is flattened.
- Make sure 'Interlaced' is checked. Click 'OK'.
- Enter filename with this format: your last name, underscore, your first name's initial, period, the extension 'gif' (without quotes, all lowercase). In Sam Sample's case, the filename would be 'sample_s.gif' (again, without quotes). Click 'Save'.
- Select the icon for your GIF file in the Finder, and use File-->Get Info to check that its size is not much larger than 30K. If it is, go back to Photoshop and repeat the conversion process after cropping and/or scaling the image.
- Before closing your image file, use Image-->Image Size to find out the size of your image (width and height, in pixels), and make a note of it for later use.
- In both cases (JPEG and GIF), you will lose image quality in the conversion process (as well as useful features such as layers). Make sure to keep an unconverted copy of your image in case you want to make additional edits later on.
return to top
- On the web, each media item is stored in a separate file, which is then called up by an appropriate tag in the HTML code.
- Updating the HTML file:
- Start up Simple Text (you may need to quit Photoshop first to free up memory), and use File-->Open to re-open the HTML file you created from PageMaker in the previous sessions.
- Click with the pointer to place the insertion bar in the text at the location where you would like to see your picture.
- For the tag to work properly, make sure the insertion point is not within a piece of text enclosed by angle brackets ('<' and '>').
- Also, make sure the insertion point is within the BODY section of the file (after <BODY> and before </BODY>).
- Enter the following HTML code:
- a left angle bracket (shift-comma)
- followed by
IMG SRC=
- followed by the name of your GIF or JPEG file, enclosed in quotes
- followed by a space
- followed by
WIDTH=
- followed by the width of your picture in pixels
- followed by a space
- followed by
HEIGHT=
- followed by the height of your picture in pixels
- followed by a right angle bracket (shift-period)
- as an example, Sam Sample's HTML file contains this line
<IMG SRC="sample_s.gif" WIDTH=350 HEIGHT=250>
- Don't forget to save. When all done, use File-->Quit to exit SimpleText.
- Testing the revised HTML file
- Make sure that the GIF or JPEG file you created in Photoshop is in the exact same folder as the HTML file you just modified.
- Test the updated '.html' file by dragging and dropping it on the icon of the web browser program. Wen the web browser loads the HTML file, it finds the tag you added and it loads and displays the image as well.
- Your image file(s) and the revised HTML file are now ready to post to the web site.
return to top
Notes
- Photoshop provides direct access to the pixels that make up a raster picture, so that you can modify each one without necessarily affecting surrounding dots. This type of operation is known as image processing.
return
- This makes it easier to follow the tutorial by returning to predictable settings. A previous user of Photoshop on the same computer might have left the program in an unusual state. The state of the program is preserved, and reloaded the next time Photoshop is used.
return
- Different types of computers with low-end displays (see the discussion of Indexed Color in the previous handout) will offer different default selections of colors (called the system palette for that type of computer). If a color used in a GIF file is not available, the apparent quality of the image will be degraded by artifacts (dot pattern used to simulate unavailable colors).
- To avoid this problem, the people at Netscape found a selection of colors available by default on both Macintosh and Windows computers (the two most popular platforms). By using only these 216 colors, when the GIF file is downloaded to most computers it should look the same as the designer saw it.
- Note that use of this palette will not solve color-calibration problems, which can make all images appear to change from computer to computer--even of the same make and model.
- For more details on this issue, see the Color Palettes for the Web page. There you will also find links to other info regarding the use of color on the web.
return
Information specific to the ACG Lab
- On ACG Lab computers, the program Photoshop is on the startup drive, inside the Paint folder. The program SimpleText is on the startup drive, inside the Text folder.
- After completing this step of the project, follow the instructions from previous sessions to log on to the file server 'ACG' and to locate the 'Web Pages-Put in Here' drop folder in the class folder. Drag both the updated version of your HTML file and your converted picture file (GIF or JPEG) to the drop folder. Before leaving, make sure to copy your HTML and Photoshop files back to your Zip disks.
- The online documentation for Photoshop is available on the 'ACG' lab file server, in the 'ACG_DOCS' volume.
- The Art Computer Graphics program of Fullerton College offers a class entirely devoted to Photoshop, ACG132-Electronic Paint. Find it in the schedule of classes.
return
|
previous handout |
return to top |
next handout |
|
This document originally at <http://acg2.fullcoll.edu/FACULTY/CORSI/LEARN/OVERVIEW/OV050MAC/INDEX.HTM>
|
|
Copyright 1997-2000 by Sandro Corsi.
Last modified 2000-09-18.
|
SaneDraw home
|