|
previous tutorial |
ACG home |
Instructor home |
Class home |
List of tutorials |
next tutorial |
Before beginning the project
- If you are working in the ACG Lab
click to read these important notes before you start the tutorial.
This section of the directions contains information that pertains specifically to the way the ACG Lab operates. It may not apply if you work on the project elsewhere.
- If you need to get for yourself the programs mentioned in this tutorial:
Tutorial Goals
- In this tutorial, we will create visual elements that will appear in an animation on our web page. In later tutorials we will work on sequencing these visual elements, as well as adding a soundtrack.
- The program introduced in this tutorial is Director. For our project, we will focus on Director's animation features.
- After the initial setup, where we make sure that the program meets our requirements, we proceed to choose the most suitable content for our animation.
- For the visual elements, you have a choice of:
- At the end of the tutorial, you will have one Director file containing all the visual elements. This file needs to be saved so you can add to it in later tutorials.
Basic Setup
- Set the computer display to 256 colors, so that your pictures will be automatically set to 8 bits per pixel of color content (this will reduce file size). You can use the Control Strip (displayed by clicking on the tab "protruding" from the margin of the screen).

- Reset Director to factory defaults by trashing the file 'Director 8 Preferences' (it's in the 'Preferences' folder inside the 'System Folder' on the startup disk).
- Recovering from mistakes: like many other programs, Edit-->Undo will recover from the last editing operation only. You can retrace your steps further back using File-->Revert (provided you had previously saved a satisfactory version of your work in progress).
- Open the windows you will need for this first part of the animation process (you can use the Window menu to do it).
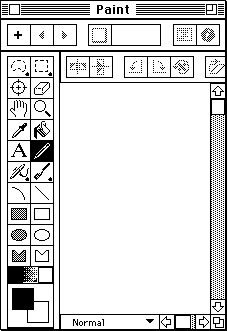
- The Paint window. This is where you can create new pictures, or modify pictures imported from outside Director.
- The Cast window. This is where all the elements (pictures, sounds, etc.) that make up the animation are stored.
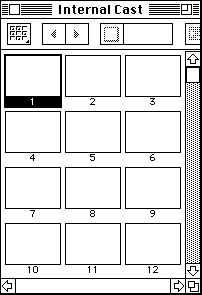
 If necessary, click the View Style button in the upper-left corner of the window to display cast members as thumbnails.
- The Stage window. This is where the animation will play back.
- All other windows can be closed.
- Set the width and height of the animation to a small size for quicker download.
- Make sure the Stage is the active window by clicking on its title bar.
- If the Property Inspector is displayed, click on its 'Movie' tab. Otherwise use the Modify-->Movie-->Properties command to display it.
 If necessary, click the View Style button to turn off List View, so that the palette contains menus and icons, like this:
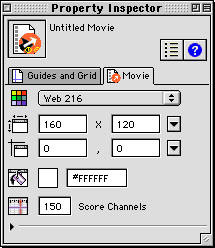
- Use the first pop-up menu to set the Default Palette at "Web 216".
- Use the second pop-up menu to set the Width to 160 and the Height to 120.
- If necessary, you can choose a slightly larger movie size, but keep in mind that this will generally increase the file size (though the actual size of the file is affected by a number of other settings as well).
- Use the third pop-up menu to set the Location to 'Upper Left' (you can also drag the Stage window directly to a convenient location.
- Leave Score Channels (last field) set to 150.
- You can also choose a different background color (Stage Fill Color) to replace the default white:
- Choose the 'Palette Index' color model (if you don't see this option, you may have to expand the Inspector by clicking on the triangle at the bottom left).
- Click and hold on the color swatch next to the paint bucket icon, choose a color from the palette.
- Make sure to save your work as you go along, using the File-->Save command.
Animation Contents
- Plan for two types of animation
- Paint window animation--addressed in this tutorial
- This is animation that involves changes to the shape of the objects as they move.
- Examples include the wings of a flying bird, the legs of a walking person, theater curtains being drawn open, and so on.
- Stage window animation--which will be the focus of the following tutorial
- Motion of objects across the frame, or relative to each other, without changes in shape and or orientation.
- Geometric transformations (such as size changes to suggest an object appearing to move away from the user), can be handled in either the Stage or Paint window:
- Stage size changes decrease playback speed and image quality.
- Paint size changes increase file size.
- Before you start drawing, identify which parts of your intended scene actually move--these are the only ones that need to be redrawn to indicate motion. Static objects can be drawn just once and re-used over and over.
- Director allows you to assemble separate cast members into a single picture, just like you can with Photoshop layers. Objects that move at different rates should be drawn separately, and later combined on the Stage (a process we'll discuss next time). Also, the same cast member can be re-used multiple times in the same image.
- For instance, to show a hand taking oranges out of a bowl
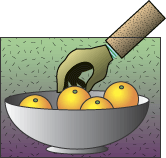
you would draw separately:
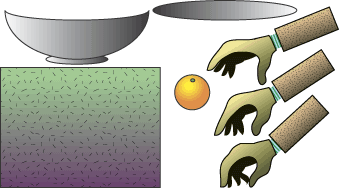
- The outside of the bowl--this will be layered in front of all other elements.
- One picture of an orange. This will be placed in the image repeatedly to fill the bowl.
- The inside of the bowl--to be layered behind other elements, so that it will be revealed gradually as the hand removes the oranges.
- Several different pictures of the hand, in different positions: extended (as it approaches the bowl) and closed (as it grasps the oranges).
Avoid spending a lot of time on registration problems. Animating characters that fly or swim lets you avoid this issue altogether. Walking characters must be aligned with the ground accurately to yield convincing motions.
- To create a short and effective animation, make sure that the beginning and the end of the motion are the same. This allows you to loop the animation (i.e., play it indefinitely), thus getting greater mileage from a small file.
Import Images
- If you want to add pictures from outside sources (e.g., from the scanner) to your animation, use the File-->Import command.
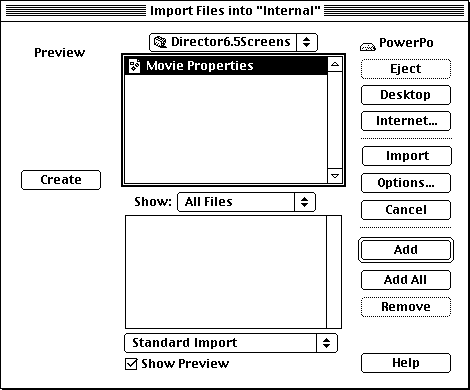
- Select "Pictures" or "All Files" from the Show pop-up menu, and make sure that "Standard Import" is selected in the pop-up menu at the bottom.
- Look for the picture file on the disk, and click on its name to select it; then click 'Import'.
- If any pictures do not show up in the list of files, they were probably not saved in a format that Director understands. You can use Photoshop to open them, then use the Save As command to convert them to PICTs.
- Director may display the Image Options dialog. If it does, pick settings that will minimize the size of the file without serious damage to the image:
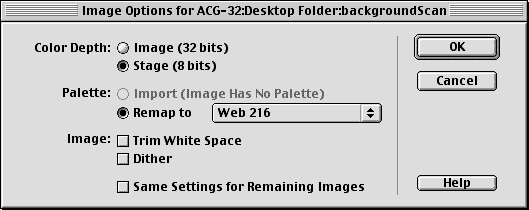
- Choose the lowest of the two Color Depth values displayed (or either one if they are the same).
- If 'Remap to' is not greyed out, choose 'Web 216' for the palette.
- If 'Image' Color Depth is higher than 'Stage' Color Depth, and the image is continuous tone (like a photograph), then check 'Dither'.
- If there is extra space around your image, you can check 'Trim White Space' to get rid of it.
- If all of your images have the same color settings, check 'Same Settings...'.
- Click 'OK' to exit the dialog.
- After importing, thumbnails of the images will appear in the Internal Cast window.
- Double-clicking the thumbnail opens the picture in the Paint window, where it can be modified as needed.
Paint Images
- To create new animation images, click on the "+" button at the top-left of the Paint window. This will create a blank new cast member.

- Use the painting tools in the Paint window's toolbox (similar to the toolbox in Photoshop) to create your picture.
- To change type of brush, double-click on the Paintbrush tool in the toolbox to display the Brush Settings dialog.

- The Brush Settings dialog appears. Pick a new size and shape by double-clicking on your choice in the grid on the left.
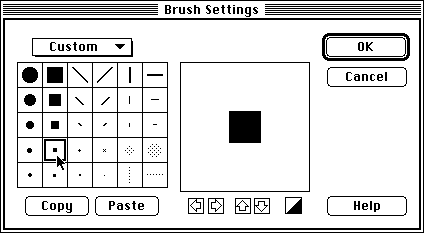
- Select the color to paint with by clicking and holding on the foreground color swatch in the toolbox, then sliding the cursor over to select the new color in the palette.
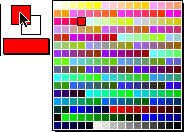
- In most cases, you will want to set the Ink pop-up menu (at the bottom-left of the Paint window) to 'Normal'. You can experiment with the other settings to achieve special effects.
- Director does not implement transparency directly the way Photoshop does. However, you will be able to tell it later to make the white parts of your picture transparent.
- If you plan to do this, make sure not to use white for any parts of the picture you want to keep opaque in the animation (use a very light color instead).
- If you need to erase (= white out) everything and start over, double-click the Eraser tool in the toolbox.

- For pictures representing the various positions of an animation character, it is helpful to modify a copy of the previous picture rather than start from scratch each time.
- In the Internal Cast window, click on the thumbnail of the picture you want to duplicate.
- Use the Duplicate command in the Edit menu.
- An example of this technique is the popular 'invisible writing hand' effect:

- Handwrite a word (such as your name) in a paint cast member.
- Duplicate the cast member. Use the eraser to remove a bit of the writing.
- Continue duplicating the last cast member, each time erasing some more of your handwritten strokes, until there's none left.
- When this sequence is played back in reverse, it will appear that the word is being written by an invisible hand.
You may also want to see previous and/or following positions as you draw. This lets you compare the images directly, and fine-tune the changes between them.
- Display the Onion Skin palette using the View menu.

- click on the first button on the left of the palette to turn Onion Skin on.
- Use the second and third controls from the left to select how many previous/following images you want to see.
- Note: this feature only works if your pictures appear one after the other in the Internal Cast window, without gaps. You can drag the image thumbnails in the Cast to re-arrange them.
Notes
Director
-
Director is a leading tool for multimedia creation. It is a direct descendant of VideoWorks, one of
the very first Macintosh programs.
-
Director comprises two distinct layers of features:
-
2-D Animation: the process of creating several slightly different
pictures which, when displayed in rapid sequence, create for the viewer
the illusion of motion. Director includes capabilities for painting the
individual pictures, and for arranging the pictures in a time sequence.
-
Interactive Multimedia: gathering and integrating elements of various
kinds (text, video, sound, etc.), with the addition of controls (pushbuttons, menus, sliders, etc.) that let
the viewer determine the course of the presentation.
Registration
-
An animation comprises a sequence of images called frames. Any changes
from one frame to the next are perceived as movement. In other words, any
part of the scene which is not supposed to move should align from
frame to frame. The alignment process is called registration.
Color Depth
-
The color depth of an image (as we already found out) determines how many colors it can include.
As the depth increases, so do the number of colors and the amount of storage required for the
image.
-
Commonly used color depths include: 1 bit (= 2 colors); 4 bits (= 16 colors);
8 bits (= 256 colors); 16 bits (= thousands of colors); 24 bits (= millions
of colors).
-
The storage requirements affect the size of image files. In animation, they also affect the speed and smoothness of playback.
-
Director automatically sets the depth of new cast members to the depth of the
display at the time the animation was first created. This can be changed later, if necessary.
-
The depth of the display can be set using various system controls, such
as the Control Strip used at the beginning of this tutorial.
-
The depth of an imported image is set at the time the image is created.
In the case of a scanned image, it's one of the settings in the scanner
software.
-
Director detects discrepancies between the depth of an imported picture
and the movie default, and offers to reconcile the two in the Image Options dialog
-
Note that this is not strictly indispensible, and in fact an important
strategy in making Director files as small as possible is to fine-tune
each picture separately, lowering its depth while retaining the overall
appearance.
-
All the images, however, must share the same color map, and this is somewhat
more difficult across different bit depths. For simplicity, this introductory
tutorial will keep all images at the same depth of 8 bits.
Information specific to the ACG Lab
- On ACG Lab computers, the program Director is on the hard drive, inside
the Multimedia folder.
- After completing this step of the project, make sure to copy your new
Director file to your zip disks. This file will be needed again for
subsequent steps of the project. The filename can be anything you want,
since we won't post Director files to the web server.
- If you need inspiration, look at prior students' animations (only accessible inside the ACG lab). Make sure
that the browser you use is configured with the required browser plugin:
- In Internet Explorer:
- Apple menu-->About Internet Explorer
- Click the 'Support' button
- In Netscape Communicator:
- Apple menu-->About Plug-ins
- In both cases, look for the Director Shockwave plug-in. Communicator will also tell you if the plug-in is enabled or not.
- Additional information and examples concerning animation design issues is in the 'Principles of Animation' interactive presentation. Find it in this week's class materials folder on ACG_FILE.
- Make sure to set the display to 256 colors or grays, or you won't see the sample animations.
- Director documentation and Help are in the ACG_DOCS volume on the file server (you will need your ACG Student password to get in).
- The program that displays Director Help is Altura QuickHelp (in the Utilities folder on your startup disk)
- The Art Computer Graphics program of Fullerton College offers a class
dealing at great length with Director animations, ACG162-Intro to Multimedia
for Macintosh. Look it up in the ACG schedule
of classes.
return
|
previous tutorial |
return to top |
next tutorial |
If necessary, click the View Style button in the upper-left corner of the window to display cast members as thumbnails.
If necessary, click the View Style button to turn off List View, so that the palette contains menus and icons, like this: