Assembling animations using Director
|
ACG Home |
Instructor Home |
Class Home |
list of tutorials |
To complete the visuals of our animation project, we will take the pictures
(cast members) created and/or imported in the previous session,
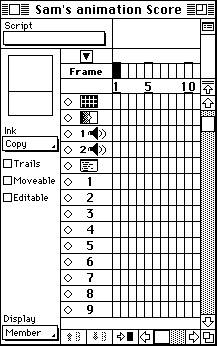
and arrange them on a timeline (called the score). The score is
arranged in vertical columns or frames (sequential moments in time);
and horizontal rows or channels. The channels in turn are divided
into image channels (numbered 1 through 48) which represent the
layering of images in the animation (with number 1 appearing behind
all others); and special-purpose channels for such things as sounds
and timing commands.
As visual items are placed in the Score, they also appear on the Stage
(the window showing the actual animation). Stage and Score are just two different ways to
look at the same animation layout, and each is automatically updated when a change
is made to the other.
After the initial setup, we will place on the timeline a background picture. This remains
in the same position on the stage throughout the animation. Next we layer a moving object
in front of the background. In both cases, we take advantage of Director features
to complete the job quickly and accurately.
Finally, we write a one-line Lingo program to make sure the animation continues to play
indefinitely. Before leaving, the updated Director file is again saved--in the following
tutorials we will add to it a soundtrack.
Basic Operation:
- Once again, check that the computer display is set to 256 colors, then
use Director to re-open the animation file you started to work on last
time.
- Make sure the windows required for this stage of the project are open:
Cast, Control Panel, and Score. Use the Window menu if necessary to open
them.
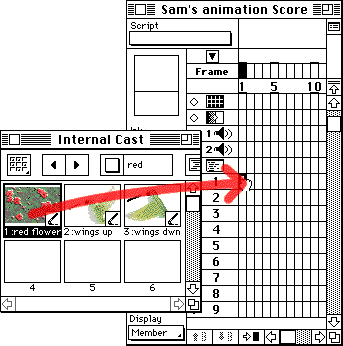
- Click on the thumbnail of the background cast member in the Cast window,
and drag it to the first cell of the Score (the intersection of frame 1
and channel 1). Dragging to the Score will automatically center the
cast member's image on the Stage, which is generally appropriate for the
background image.
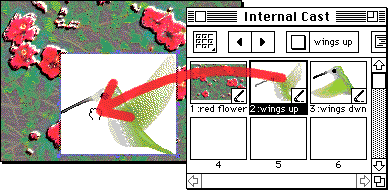
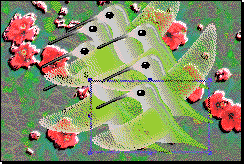
- Drag the first picture of your animated character to the Stage. Dragging
to the Stage allows you to place the character at a specific position in
the frame. The number of the cast member (02 for the example pictured
below) will appear in the next available channel of the Score, at the current
frame.
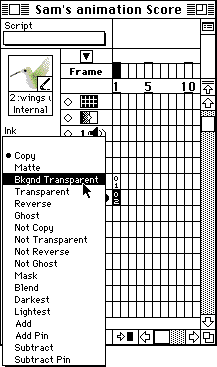
- To eliminate the white box around the picture of the animated character,
choose Background Transparent from the Ink menu in the left margin of the
Score window. Note: this will make all white pixels in the cast member
transparent: if this does not work for your picture, try Matte instead.
Most other inks can be used for special effects, but many of them will
slow down the animation substantially.
- Continue to drag pictures of the animated character to the stage to
indicate the path of its motion (don't forget to change the Ink setting
as appropriate). For a looping animation (one that will keep playing indefinitely),
you would want the first and last pictures to be located in the same part
of the frame. In addition, make sure to alternate the pictures with the
different positions of the animated character (in the example below, the
hummingbird with wings raised alternates with the hummingbird with wings
lowered).
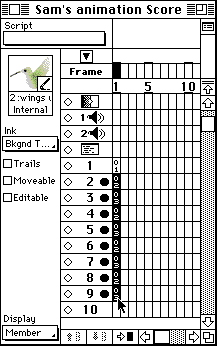
- In the Score, you will find a column of entries referring to the cast
member you just dragged. Make sure the Display menu at the bottom
left of the window is set to Member, then check that the cast member
numbers alternate properly. In the example, 02 (wings up) alternates with
03 (wings down). Click and drag to select all the entries for the animated character
(make sure you do not select the first cell, used for the background).
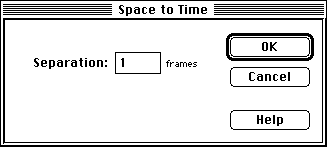
- Use the Modify-->Space to Time command. In the dialog, leave the
number of frames of Separation set to 1, then click OK.
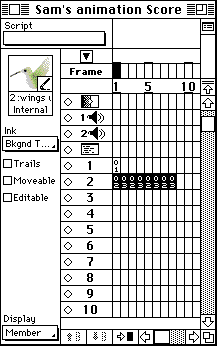
- The pictures of the animated character are now arranged in consecutive
frames. If you play the animation (Control-->Play), you will see the
character move (use Control-->Stop when done watching the animation).
Notice, however, that the background flashes on and off.
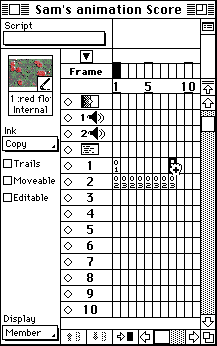
- To replicate the background picture in all the frames of the animation,
option-drag its entry in the first frame of the first channel to the last
frame (frame 8 in the example) of the first channel. This will create
a copy of the background picture in the last frame.
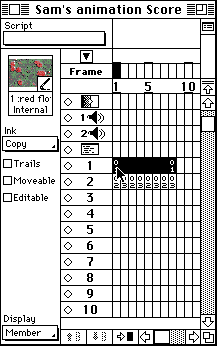
- Shift-click on the first frame of the first channel. This will select
all the first channel frames of the animation.
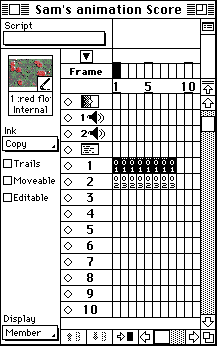
- Use the command Modify-->Inbetween to fill in all selected frames
with copies of the background picture. If you play the animation now, you
will see that the background image stays on for the duration of the animation.
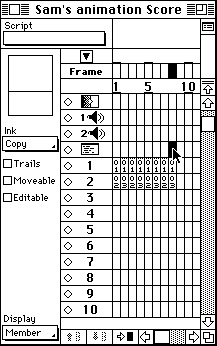
- To force the animation to repeat, double-click on the intersection
of the last frame of the animation and the Script channel (the first one
above channel one). This will open the Script window.
- In the Script window you will see two lines of text already entered
for you. The insertion bar is on the second, blank line, sandwiched between
the other two. Without moving the insertion point, type:
go to frame 1
Altogether, this is a very brief program in Lingo (the programming
language built into Director) which causes the playback to resume from
frame 1 whenever the last frame completes.
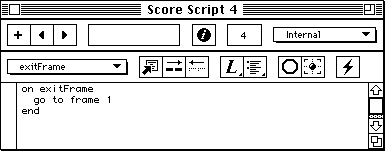
When done, close the Script window. Notice that a new item representing
the script has been added to the Internal Cast window.
- The visuals for your animation are now complete. Use File-->Save
and Compact to copy the animation to disk, minimizing its file size. In
the following sessions, we will work on adding a soundtrack.
Additional Info:
- The Art Computer Graphics program of Fullerton College offers two classes
which cover Lingo and other Director topics in greater detail, ACG162-Intro
to Multimedia for Macintosh and ACG164-Multimedia Authoring.
Look them up in our class schedules.
Copyright 1997 by Sandro
Corsi. Last modified 3 SEP 97.