Assembling Map Elements
|
ACG Home |
Instructor Home |
Class Home |
list of tutorials |
To create the map of where we live/work/study/play, we will use a vector graphics program. These programs differ from raster graphics programs (such as Photoshop, which we used for the scanned portrait) because:
- They store the picture as separate shapes instead of rows of pixels (= color spots). All you have to do to select a shape is click on it, instead of tracing around its outline.
- The shape can be smoothly scaled to any size--or, put another way, you can zoom in and see additional detail. Zooming in on raster images only magnifies the color spots without revealing anything else of interest.
- Scaling up smoothly is equivalent to increasing the smoothness of the edges while keeping the size unchanged. This means that vector images can immediately take advantage of higher resolution devices like laser printers or imagesetters, without increasing file size. Raster images will need to be processed/recreated, and the file size will increase.
- The transformations (rotation, scaling, skewing, etc.) that caused irreversible degradation of raster images (resampling), can be applied to vector images without ill effects.
The main benefit of using a vector program for our map is that viewers will be able to zoom in smoothly from a planetary view to a street level view. For a diagrammatic picture like a map, vector files are also generally smaller in size.
Of the three widely used vector programs (Illustrator, FreeHand, Corel Draw), we will use Macromedia FreeHand because its files can be compressed and embedded in web pages through the Shockwave technology.
In this initial step we will assemble a base map from existing vector clip art. Our main concern will be proper organization of the document and use of the selection and transformation tools. In a second step we will use some of the drawing tools to create our own elements to add to the map.
Combine Elements in a Layered Document
- Launch the FreeHand application (it's in the Drawing folder on each station's hard drive.
- Find the world map or globe picture you like best and open it.
- There are clip art elements available for this project on the file server. Look in this week's folder in the folder for your class.
- The clip art files are in an older format, so you won't be able to open them by double-clicking. You can instead drag their icons and drop them on the FreeHand application icon.
- Use the File-->Save As command to rename the picture you chose as your own map document.
- The exact name you use doesn't matter at the moment, since we will later export a separate file with a different name for posting on the web.
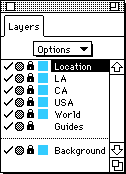
- A new FreeHand document will automatically contain three layers, named 'Foreground', 'Guides', and 'Background'. Rename the Foreground layer to indicate that it contains a picture of the entire world.
- If the Layers panel is not visible, display it using Window-->Panels-->Layers.
- Double-click on the name of the Foreground layer, type the new name world, then press the Enter key.
- Lock the layers that you are not going to use at the moment. Locking is one of the main advantages of using layers, since it prevents accidental damage to existing parts of the picture.
- Click on the padlock icons next to the World, Background, and Guides layers to close the padlocks.
- Now proceed to bring in the additional pictures for more detailed maps. Each one will be on a separate layer, renamed as indicated below:
- Find and open your favorite map of the entire United States.
- Use Edit-->Select-->All to select the entire map. Use Edit-->Copy to place the US map in the clipboard. Close the US map document.
- With your own document window active, use Edit-->Paste to retrieve the US map from the clipboard: it will appear on a new 'Foreground' layer, which gets added to the list in the Layers panel.
- Double-click 'Foreground' in the Layers panel, enter 'USA', press the Enter key.
- Click the layer's padlock icon to lock it.
- Repeat the process for a map of the state of California. Rename its layer to 'CA'
- Repeat the process for a map of the Southern California area. Rename its layer to 'LA'
- Finally, select an appropriate symbol for your home, and/or place of work, and/or school. Rename its layer 'Location'.
- There are various categories of clip art symbols in the same folder as the map clip arts.
- To preserve the correct front-to-back order, make sure that each new layer appears above the previous ones in the Layers panel list.

- The sequence of layers after all the pictures have been imported should be:
- Location
- LA
- CA
- USA
- World
- Guides
- Background
- If necessary, you can click on the name of a layer and drag it up or down to rearrange the sequence.
Modify the Pictures so they Match in Shape and Size
- Your goal is to superimpose the maps so that as viewers zoom in they see an increasingly detailed picture of your part of the world.
- Before working on a layer, unlock it by opening its padlock icon. Remember to lock the layer again when done with it.
- Another benefit of using layers is that their contents can be easily hidden, allowing easier access to parts of the drawing that would be otherwise hard to see. Hiding and showing a layer is done by clicking on the check mark next to the layer's name.
- Use the Arrow tool to:
- Click on a picture to select it in its entirety (all the pictures you imported are grouped).
- Grouping means that two or more shapes are 'glued' together so that they can be handled as a single unit.
- Option-click to select just a part of the picture. Click again on a point (one of the small boxes that appear along the outline of the shape) to select just that point (it will change from a solid box to an outline box).
- Drag within a selection to move it.
- Drag one of the corner handles of a selected group to resize it.
- If you wait briefly before dragging, the cursor will change to a cross shape and you will see a more accurate preview of the image as you transform it.
- Drag with the Rotate tool (3rd from the bottom on the left side of the toolbox) to re-orient the selection.
- Use the Knife tool (4th from the bottom on the left side of the toolbox) to cut off portions of the selection.
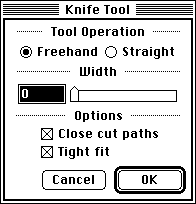
- Double-click the Knife tool in the toolbox. In the dialog that appears, choose 'Freehand' and 'Close cut paths', drag the slider to the left (zero width), then click OK.

- Option-click to select just the shape you want to edit
- Drag the knife to indicate where to cut the shape. The shape will be broken into two separate shapes along the cut.
- Press the Tab key to deselect. Option-click to select the part of the shape that you don't want, then press the Delete key to remove it.
Additional Info:
- There is extensive online help on Freehand, available to you in the Apple menu.
- The Art Computer Graphics program of Fullerton College offers a class covering both FreeHand and Illustrator, ACG112 Electronic Illustration. Find it in the class schedule.
Copyright by Sandro Corsi.Last modified 25 Oct 97.