Computer Graphics Survey
Rendering a 3D Scene and Exporting to VRML
Using Strata StudioPro 2.5 on MacOS Computers
| previous handout |
ACG Home |
Instructor Home |
Class Home |
list of tutorials |
next handout |
Before beginning the project
Read the
information that pertains specifically to the way the ACG Lab operates.
This section of the directions may not apply if you work on the project elsewhere.
To complete the 3D portion of our web page we will return to Strata StudioPro
to:
- Export the model as a VRML file. VERY IMPORTANT: make sure to complete this step before proceeding with the rest of the project.
- While the VRML standard supports textures and other rendering attributes, the VRML files exported by the current version of Strata StudioPro do not perform properly with the VRML viewers available to us. We will therefore output a VRML version of our scene before adding any rendering settings
- The 2-D thumbnail, fortunately, will fully display all your rendering choices.
- Setup scene views to resume work on your model.
- Choose the rendering attributes for the scene.
-
Render a thumbnail image of the model, to be used for a hyperlink to the actual 3d scene.
-
Edit the homepage HTML file to add a link to the VRML file, using SimpleText.
- Re-open the 3D logo file created in the previous session, using Strata StudioPro.
-
Use File-->Save As to display the Save dialog
-
Choose 'VRML 1.0' from the 'File Format' pop-up menu at the bottom of the
dialog.
-
Enter the filename (all lowercase) according to these rules:
-
Your last name
-
An underscore (Shift-hyphen)
-
Your first name's initial
-
A period
-
VRML world extension: wrl
-
Sam Sample's file would be named sample_s.wrl
-
Click 'Save'
-
Strata StudioPro won't be able to open the VRML file if you need to make
changes to the scene. Make sure to also use the File-->Save command to
update the StudioPro version of your document, and keep it on your disks.
- In the following steps, we will add features to the scene that may make it impossible to export a working VRML file.
Before you continue, you might want to save two separate Strata StudioPro documents. One (let's call it 'scene for VRML'), you'll set aside in case you needed to re-export VRML.
The other (call it 'scene for thumbnail') you'll use for the remainder of the project.
| return to top |
- Make sure you are still viewing an Orthographic projection (slider at the top of the document window).
- Switch to a shaded display (second pop-up menu at the top-left of the document window).
- As you work, switch to an appropriate view
- The object should be oriented so that the surface to be textured is parallel to the viewing screen.
- For instance, to apply a tiled texture to the top of the pedestal, we would switch to the Top view.
- Note that because of the way we built the pedestal, the texture will actually apply to its support column and base as well. The same is true of the other objects as well--rendering attributes apply throughout the object.
- If it is important to you to be able to texture differently the various parts of the pedestal, consider rebuilding the object from separate shapes, perhaps using 3D primitives.
- Render the scene whenever you need to check effects not displayed in the modeling window.
- Use the pop-up menu at the very bottom of the toolbox to choose the quality of the rendering (higher quality requires more time).
- For a quick check of texture placement, Scanline-->SL Quick is adequate.
- To see properly the effect of lighting changes, you will instead need one of the options from the Raytracing submenu (typically slower).
- Choose the rendering camera tool

- Click and drag in the document window to select a small portion of the scene, including the textured object.
- A rendering window will appear on top of the document window and, after some time spent computing, a more accurate rendering will appear, allowing you to better judge the appearance of the textured object.
- To continue to work on your 3D model, you will want to close the rendering window. If at this time a dialog appears asking to save you can click 'No' (the dialog is for the 2D picture, not the 3D model).
| return to top |
- Review the techniques listed below, and use any combination of them to texture the objects in the scene.
Create and apply a new solid-color texture
- Use the selection tool to select the object you want to texture.
- If the Resource palette is not visible, display it using the Windows menu.
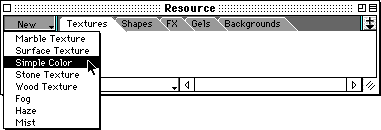
- In the Resources palette, click on the 'Textures' tab. Choose 'Simple Color' from the pop-up menu 'New'.
- The 'Simple Color' dialog appears
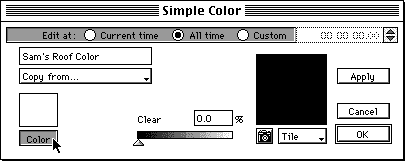
- Enter a name for the texture.
- Click on the 'Color' button to bring up the Color Picker.
- Use any of the color models available (scrolling list on the left), to mix the new color.
- You also have the option of making the object transparent. Transparency may slow down renderings.
- Click 'OK' to exit the dialog and apply the new texture to the selected object.
Create and apply a new glossy texture
- Use the selection tool to select the object you want to texture.
- Choose 'Surface Texture' from the pop-up menu 'New' in the Resources palette.
- The 'Surface Texture' dialog appears
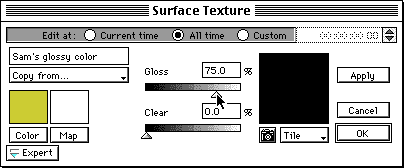
- Enter a name for the texture.
- Click on the 'Color' button to bring up the Color Picker and choose a color.
- Drag the 'Gloss' slider to the desired setting. To see adjacent objects reflected in the textured object, gloss must be set to a value higher than 65%.
- Click 'OK' to exit the dialog and apply the new texture to the selected object.
Apply an existing texture to an object in the scene
- Make sure the object to be textured is selected.
- If necessary, click the Library button to expand the Resource palette.

- Find a texture you like:
- Use the tabs and the horizontal scroll bar at the bottom of the palette to see previews
of the textures applied to a default beveled square.
- Use the pop-up menu at the bottom-left of the palette to see a list of texture
names.
- Click on the texture preview to select it, then click the apply button:
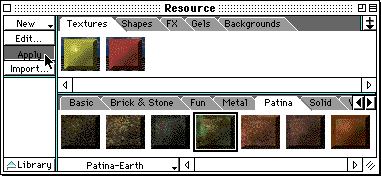
- In the modeling window's Shaded display, the object will merely change color to an approximation of the dominant color in the texture.
- Remember to use the rendering tool whenever you need a more accurate view of your work.
| return to top |
- Change the orientation and settings of the default light
- If necessary, use the Windows menu to display the Environment palette, and click on the Lights tab.
- In the dark circle in the middle of the palette, find the default light: a
white oval indicates its location, and a white line indicates its direction.
Drag the oval and the document window will update to show the effect of the
new lighting direction.

- Click on the 'Color' button to bring up the Color Picker. Choose the light's color. Click 'OK' to exit the Color
Picker.
- Drag the 'Intensity' slider to adjust the brightness of the light.
-
Create and adjust a new light. This can be used to light the inside of the room, so details of your logo are more visible.
- Choose the Point Light tool

- Click in the document at the location of the new light. Adjust the radius of the light by dragging the handles on the red circles surrounding it.
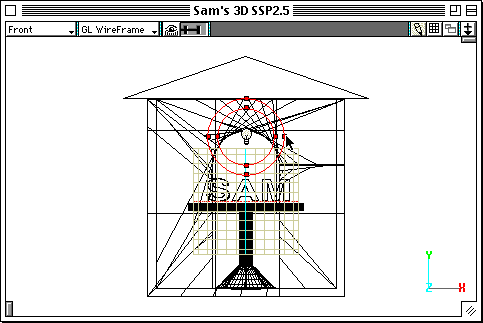
- Make sure to check the position of the light from other views as well.
- Again use the camera at the bottom of the toolbox for a test rendering, to
better see the effect of your lighting adjustments.
| return to top |
- The other tabs in the Environment palette allow you to add:
-
An infinite, textured ground plane.
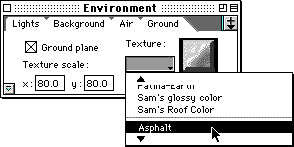
- A backdrop gradient or image.
- Atmosphere effects such as haze or mist. Beware of overly dense fogs which may obscure your scene completely.
- Environment effects will only appear in renderings (not in the modeling window).
| return to top |
This picture will be used as a thumbnail for the link from your web page
to your VRML file
-
Change your viewpoint to show the scene at its best
-
Use the slider at the top of the document window to switch to a perspective
view ('Normal' or 'Wide Angle' lens).
-
Use the first 3 tools at the top-left of the toolbox to, respectively, Pan,
Rotate, and Zoom your view of the scene.
-
If you get lost in the process, use the command Windows-->Fit Views to
All to return to your model.
-
Do a draft-quality test rendering. Close the rendering window (without saving). Make further adjustments if necessary.
-
Render and save the final image as a JPEG file
-
Use the pop-up menu at the bottom of the toolbox to choose Raytracing-->Best
for rendering quality.
-
Use the rendering camera tool to select the most significant portion
of the scene. To keep download times short, keep the selection as small as possible to adequately represent your work.
-
The rendering window will appear on top of the document window as usual.
This rendering will take a bit longer, since there are many more computations
involved.
- Make sure that the rendering is still the active window, then use
File-->Save As to display the Save dialog
- Choose 'JPEG' from the 'Format' pop-up menu at the bottom of the
dialog
- Enter the filename (all lowercase) according to these rules:
- Your last name
- An underscore
- Your first name's initial
- Another underscore
- logo
- A period
- JPEG image file extension: jpg
- Sam Sample's file would be named sample_s_logo.jpg
- Click 'Save'
- Close the rendering window.
| return to top |
- Make sure the VRML file exported by Strata StudioPro (called 'yourname.wrl) is in the exact same folder as your other files for the web.
-
Drag the icon of your homepage file (called 'yourname.html') and drop it on SimpleText
-
Click to place the insertion point where you would like to see the thumbnail
linking to your VRML logo scene.
-
As always, make sure that the insertion point is not within a portion of
text enclosed in angle brackets ('<' and '>'), and that it is within the 'BODY' container (after <BODY> and before </BODY>).
-
Enter the tag to display the thumbnail:
-
<IMG SRC="YourJpegFileNameGoesHere">
-
Before the IMG tag, enter the start tag for the link to your VRML
file:
-
<A HREF="YourVrmlFileNameGoesHere">
-
After the IMG tag, enter the end tag for the link:
-
Following all of the above instructions, Sam Sample's HTML file would contain
this line:
-
<A HREF="sample_s.wrl"><IMG
SRC="sample_s_logo.jpg"></A>
Before leaving, make sure you transfer your new 3d file and the edited
HTML file to the file server for posting to the web server.
| return to top |
Notes
A standard way to describe the contents of a 3D scene. It is used in some web sites to give greater immediacy to the viewers' experience. It's advantages include:
- Relatively small file sizes (instead of a series of pre-computed animation frames, the viewers download only the instructions necessary for their computer to generate the actual animation). Also, the same scene, once downloaded (or otherwise distributed to users--e.g., on a CD-ROM) can be re-used in a variety of ways, speeding up subsequent interactions.
- Greater viewer control and, as a consequence, greter involvement: each participant can select a unique viewpoint within the scene, while various interactive options can be added in a later version of the standard (VRML 2.0).
- The opening up of new ways to present information and tell stories, altogether different from any traditional medium.
The main disadvantage of VRML is that it requires viewers to have access to fairly powerful computers to properly experience the 3D environment. VRML has also been hampered by spotty support in browser software, and a conflicted standardization process. In fact, VRML is currently in limbo and due to be replaced by X3D "really soon".
return
Information specific to the ACG Lab
- The StudioPro application is in the 3D Modeling folder on the startup drive.
- On most ACG lab computers, Internet Explorer is the browser currently configured with a VRML plug-in.
- Look up in the class schedule
the Art Computer Graphics classes covering 3D topics, ACG120: 3D
Computer Graphics for Macintosh and ACG150: 3D Computer
Animation for Macintosh.
return
| previous handout |
return to top |
next handout |
|
This document originally at <http://acg2.fullcoll.edu/FACULTY/CORSI/LEARN/OVERVIEW/OV140MAC/INDEX.HTM>
|
Copyright 1997-99 by Sandro Corsi.
Last modified 29 Nov 1999.
|
SaneDraw home
|