Final Project: HTML Authoring
|
ACG home |
SaneDraw home |
Instructor home |
learning resources home |
class home |
handouts index |
Overview of the first phase of the final project
The final project will involve the creation of web pages.
The standard on which these documents are based is called HyperText Markup
Language (HTML).
Find and open
the program GNNpress.
- GNNpress is a freeware WYSIWYG (what-you-see-is-what-you-get) HTML
editor. It allows authoring many simple web pages without entering
HTML tags directly.
- The development of HTML at the moment is outstripping the capability
of software publishers to update their editors. Many newer features, therefore,
still require manual entry of tags.
Find and
'webize' your folder on
the lab's web server.
- The term 'webize' is specific to GNNpress--it means creating a graphic
overview of the contents of a folder containing web documents. This diagram
is called a MiniWeb--another term unique to GNNpress.
- Each student in the class has a folder in a
'students' folder for this class, located
on the web server. All files created as part of the project should be placed
in their author's folder. Strict adherence to naming and location rules is
necessary to make the hyperlinks work.
Create
the home page for your
folder.
- The generic meaning of 'home page' is that of first document that
users see when visiting a site or a section of a site.
- More narrowly defined, the home page is the document returned by
the web server when a browser requests access to a directory (a folder) without
specifying a filename (for instance, when using a URL such as
'http://info.acg.fullcoll.edu').
- The default name of the home page varies depending on the configuration
of the web server, although the one most often used is 'index.html'. If the
web server does not find a file with the expected name in the directory,
it returns a listing of the contents of the directory.
- If the file is not accessed through the HTTP protocol (for instance,
a file residing on a hard drive or CD-ROM connected directly to the computer
running the browser) the special home page status is not recognized for any
file. Accessing a directory always returns a listing of its contents.
- The table of contents for the students'
project files lists the
names of all the students with links to their work. For these links to work,
each student's folder must contain a home page file named 'index.html'.
Add text and a heading to your home page.
- You can type and edit text in GNNpress as in any word processing application. You can also paste or import text from other programs.
- Formatting, however, works in a mostly different way, reflecting HTML's purpose: indicating the structure of a document rather than its appearance. Even though most formatting commands will cause the appearance of the text to change, the exact nature of the change will vary from browser to browser.
Insert your photograph in your homepage.
- You can reuse the photo you scanned for the 'Classmates' project, after converting it to GIF format (simply open it in Photoshop, do a Save As and select 'Compuserve GIF' as the file format).
- Copy the GIF file to your folder on the web server.
- Use Element-->Image, then click 'Browse' to find and open the GIF file.
Create additional pages for your site.
- Make the MiniWeb window active, then use File-->New Page. A new icon will appear in the MiniWeb, and a new Page window will open.
- Follow the procedure used for the home page to title and save the additional pages.
Compose the table of contents for your site.
- Use the List submenu in the Format menu to begin a list. Press 'Return' to separate the items in the list. Use Format-->Exit List Format to complete the list.
- Link each item in the list to another page in your site by selecting the text of the item, then using Element-->Link. Click 'Browse' to find and open the page you want as the destination of the link.
Test the page(s) in Netscape. When done, make sure to
save your
work for refinements in the next session.
Find out about HTML. The best source for this information
is the web itself. Short of a real connection to the Internet, your second
best choice is to look at the material replicated on the internal web servers
in the lab. As always, keep in mind that the links within these pages will work only if they reference material that is replicated locally.
Step-by-step instructions
Open GNNpress
GNNpress is located in the Multimedia folder in the hard
drive of each lab computer:
Note that several features in the program require a
live link to the Internet. Since our lab is cut off from the outside world,
you need to work your way around some of the problems:
- In the Help menu, the only usable command is 'Contents'. This will
bring up the first of several pages of help info stored on your hard drive
along with the application.
- Most of the links in the help pages will work, but some lead back to
the GNN servers. The most important item, the
GNNpress
User Guide has been replicated on our internal
web server. Make sure to scroll down to the table of contents links--do
not try to use the Search form (all forms require a connection to
the
GNN server for query processing).
- The commands in the Tools menu to search and administer servers and pages
only work if your web site is hosted on GNN's computers.
- File-->Upgrade GNNpress will not work.
- The Browse menu offers the standard commands for browsing web pages (some
of these commands are replicated in the toolbar). Note, however, that as
a browser GNNpress is extremely slow--you are better off using Netscape Navigator
for this purpose.
The program opens with its default home page (stored
on the hard drive as part of the help). You can browse around if you wish
to find out more about the program. When done, make sure to close the window
to conserve program memory (you can get the help window back using
Help-->Contents).
Tools-->Preferences-->Configure Toolbar allows
you to add your choice of commonly used commands to the toolbar at the top
of the window.
| return to outline |
Find and 'webize' your folder on the lab's
web server
The class web pages are currently stored on a separate
hard drive connected to the web server in the lab. This hard drive will be
used eventually as the master for the class CD-ROM. While connected through
a web browsers (which uses the HTTP protocol), the web pages appear as just
another part of the lab site, as read-only documents. Connecting through
the Chooser (using the AppleShare protocol), the drive will mount as an icon
on your desktop, and you will be able to add and modify files in your own
folder.
Apple menu-->Chooser. Log on to the information
server with the class name and password.
- Click on the AppleShare icon (left half of the dialog), and find
the server 'InfoServer-IIci' in the list on the right. Click 'OK'
- Enter the name and password mentioned in the lecture and click 'OK'.
Note that this
gives everybody in the class the same access privileges--make sure not to
accidentally damage other people's work. It is also important that you keep
a backup of all the files that you place on the server--in case an accident
does occur.
- In the list of volumes that appears, choose 'acg164' and click 'OK'.
- Close the Chooser window. The 'acg164' volume appears as an AppleShare
icon on your desktop.
- In GNNpress, choose File-->New MiniWeb. This will create a blank
MiniWeb window and reconfigure the menus, giving you access to the Webize
command. Choose
Tools-->Webize.
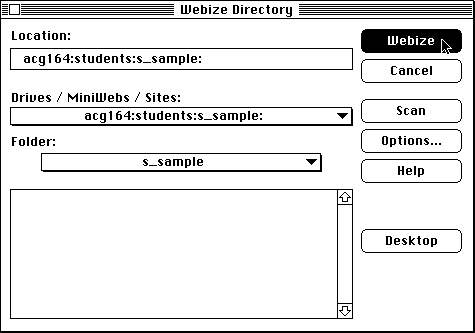
- In the dialog that appears, use the 'Drives / MiniWebs / Sites' pop-up
menu to select 'Desktop'.
- Use the scrolling list at the bottom of the dialog to find and open the
folder with your name (e.g., 's_sample' for Sam Sample) inside the 'Students'
folder on the 'acg164' volume.
- Click on the Webize button. A new MiniWeb window appears--note that the
title bar shows the pathname of your folder.
The first MiniWeb window (whose title includes 'GNNpress
1.1:MW1') is still open behind the new window. To avoid confusion, it is
advisable that you close this first window.
| return to outline |
Create the home page for your folder
The home page for your folder will appear in the MiniWeb
window as an icon, as well as a document in a separate Page window,
where you will be able to enter and format text and images.
While the MiniWeb window for you folder is active,
choose File-->New
Page.
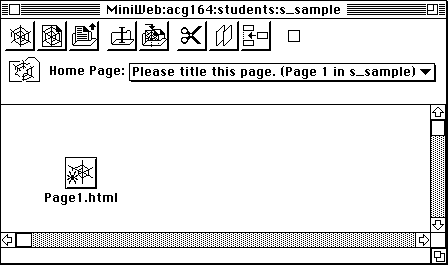
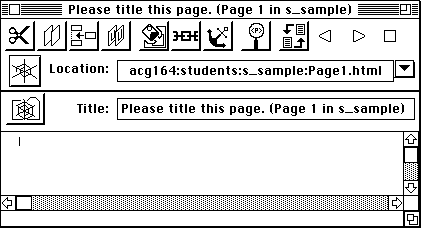
- You should now have an additional window. Shrink the windows, if
necessary, so that you can see both the MiniWeb and the Page windows.
In the 'Title' field at the top of the Page window,
enter the title of your home page (this will be displayed in the title
bar when the page is accessed by a web browser). A good title could be your
first and last name.
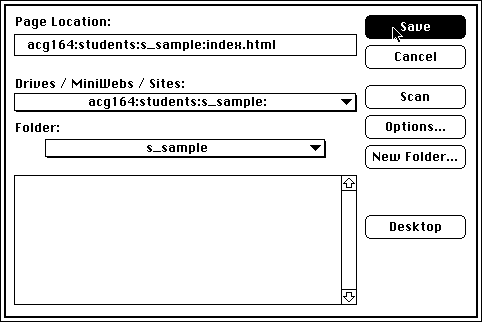
While the Page window is active, choose File-->Save
As. The default page name ('Page1') should be already highlighted in the
'Location' field at the top of the dialog. Type 'index' to replace the selection,
so that the file name (the last item in the path name, after the last colon)
reads 'index.html'. Make sure that the name of your folder is displayed in
the 'Folder' pop-up menu, then click
'Save'.
Check that the new title and filename are now reflected
in both
windows:
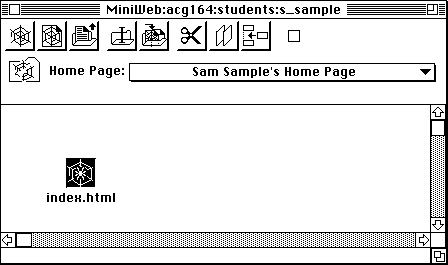
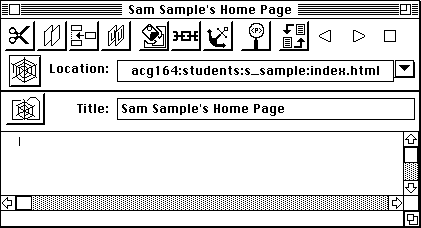
| return to outline |
Last modified 24 OCT 96 by
Sandro Corsi


