Puzzle Project: Improving the User Interface
|
ACG home |
SaneDraw home |
Instructor home |
learning resources home |
class home |
handouts index |
Outline of the third phase
of the project
After completing the layout and logic of the game, we
need to add the basic "niceties" that will make it usable.
Find and
re-open the Director movie
with your puzzle.
Edit the initialization
movie script created
in the previous session to support the new features we will add now.
- Just as before, we want to avoid "hardcoding" information about how
the movie is organized.
- This for instance means that, rather than type a channel number
directly in a cast member script, we instead:
- first define a global variable with
the channel number in the Initialization script
- then reference the global
variable in the cast member script.
- This way, if anything changes in the layout of the movie (say, a
sprite
needs to be moved to another channel), we only need to make edits to the
Initialization script. This minimizes the possibility that some script elsewhere
will not reflect the new layout.
- The new global variables that we declare and initialize keep track
of:
- The names of the sound cast members used in the game.
- The location of the help and credits text in the score.
- The number if times that game pieces are moved when the puzzle is scrambled.
Add
a button
to scramble the
gamepieces.
- The button is another bitmap cast member, this time with a script
attached to it.
- The scrambling process again relies on the object-oriented framework
of the game. To scatter the gamepieces, we send the 'move' message to randomly
selected squares.
Add a button
to reset the pieces
to their correct
locations.
- This button is similar, and can be created by duplicating the previous
one in the cast window, then applying the necessary modifications.
- To reset the gamepieces, we send in turn the 'setPicture' message to
each square, with the number of its default bitmap cast member (this,
again, relies on all gamepiece cast members being in consecutive positions
at the beginning of the internal cast window). Finally, we reset the global
variables that track the position of the 'hole'.
Add a text cast
member with help on
how to use the
game, and a button to show and hide this info.
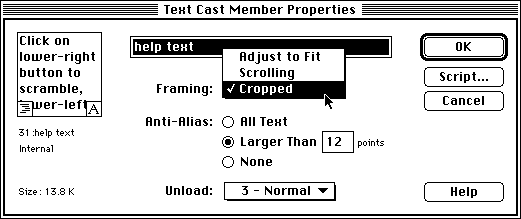
- In Director 5, a text cast members differs from a field primarily
because:
- It cannot be edited by the user while the movie is playing.
- Fonts used to set the type need not be installed on computers used for
playback.
- Type is anti-aliased during playback, improving the appearance of
larger characters.
- The button's script operates as a 'toggle switch': if the text is
visible,
clicking the button will hide the text. If the text is hidden, clicking the
same button will reveal the text. The text can also be hidden by a click
on its sprite.
Add another
text cast member with
the credits for
the game, and a matching show / hide button.
- These two additional cast members are very similar to the ones for
the help.
- Since the type is likely to be smaller, make sure that anti-aliasing
will not be applied, since it tends to worsen legibility at small sizes.
Import sounds
for the various gameplay
events.
Modify the scripts
to play the sounds
at the appropriate
time.
- The 'puppetSound' command can be used to replace the 'beep' commands
used in the previous version of the game, indicating the name of the sound
cast member to be played.
- To make gameplay more interesting, we can import several different sounds
for the motion of the gamepieces, and choose among them at random. While
this increases the file size, the current version of Shockwave includes sound
compression features that will minimize the increase.
Run and test the movie.
When done,
use the Afterburner
Xtra to convert the movie to Shockwave for Director format.
- Shockwave files are compressed, reducing the time required to download
them across the Internet.
- Coverted files are also locked, preserving the author's "trade secrets".
This also means, however, that you should not throw out the original Director
movie, which is the only editable version of your work.
If you have the
Shockwave plugin
properly
installed in your browser, you can see a
working
example of this third version of the puzzle. You can also download an
editable copy of the original Director movie
(Director 5 for Macintosh format, Stuffed and BinHexed, 60,485 bytes).
Step-by-step instructions for the 3rd phase of the project
Re-open your movie
After the movie is up on the screen, you may need to again
position and size the stage:
File-->Preferences-->General, uncheck "Centered".
Modify-->Movie-->Properties, enter 240 x 240 for
the size, 0 and 20 for the location.
| return to outline |
Edit the Initialization movie script
The Initialization script is the cast member that contains
the 'on startMovie' handler. If you have trouble locating it, you can ask
Director to find it for you:
Use the Edit-->Find-->Handler command to display
a list of the handlers in the current movie. Double-click on the
startMovie entry (there should be only one) to open the script
window with
the initialization movie script.
Edit the text so that the entire script reads:
---------- Puzzle 03 -- phase 3 of the Puzzle project ------------
--------- Copyright 1996 by Sandro Corsi (corsi@ibm.net) ---------
--The scripts in this movie assume that the cast members with the
--images of the gamepieces are arranged sequentially at the
--beginning of the internal cast. The cast member for the missing
--piece (an unfilled, unstroked box shape) is the last gamepiece
--cast member.
--It is also assumed that the gamepiece sprites are arranged
--sequentially in the score, after any mumber of sprites used
--to create the background of the gameboard. The sprite for the
--missing piece comes right after the gamepiece sprites.
------------------------------------------------------------------
on startMovie
  --------------- declare global variables ---------------
  -- game size specifications
  global gNumberOfSquares, gSquaresPerRow
  -- Squares (= available positions for gamepieces)
  global gSquareList, gSquareChannelStart, gHoleColumn, gHoleRow
  -- how extensively should the gamepieces be scrambled
  global gScrambleRepeats
  -- names of sound cast memebers
  global gFrameSnd, gNoMoveSnd, gMoveSndList
  -- sprite numbers of help and credits text
  global gHelpSprite, gCreditsSprite

  --------------- initialize global variables ---------------
  put 16 into gNumberOfSquares -- total available Squares
  put 4 into gSquaresPerRow -- how many Squares wide is each row
  put [] into gSquareList -- list of child objects representing Squares
  put 2 into gSquareChannelStart -- first channel containing Square sprite
  put 20 into gScrambleRepeats -- number of random moves when scrambling
  put "Metal" into gNoMoveSnd -- sound for click on piece that can't move
  put "Penalty" into gFrameSnd -- sound for click on gameboard frame
  -- sounds chosen at random for clicks on gamepieces that can move
  put ["Gabing","Pavel","Swhish","Whip"] into gMoveSndList
  put 47 into gHelpSprite -- channel for help text
  puppetSprite gHelpSprite, TRUE -- put help text under script control
  set the visible of sprite gHelpSprite to FALSE -- initially hidden
  put 48 into gCreditsSprite -- channel for credits text
  puppetSprite gCreditsSprite, TRUE -- put credits text under script control
  set the visible of sprite gCreditsSprite to FALSE -- initially hidden
  -- initialize missing gamepiece position to be the last Square
  put (gNumberOfSquares-1) mod gSquaresPerRow+1 into gHoleColumn
  put (gNumberOfSquares-1)/gSquaresPerRow+1 into gHoleRow

  --------------- create Square objects ---------------
  repeat with SquarePosition = 1 to gNumberOfSquares
    append gSquareList, new(script "SquareParentScript", SquarePosition)
  end repeat
  updateStage -- force redraw
end
Press <Enter> (on the numeric keypad) to close
and recompile the script. If any errors are reported, double-check your spelling.
| return to outline |
Create button to scramble the gamepieces
Since we want to keep file size as small as possible,
consider creating a small design that can be enlarged on the stage. Also,
it is possible to colorize 1-bit castmembers and create a colorful effect
with very little memory use.
Use your favorite method to create a blank new bitmap
cast member (e.g., Window-->Paint, then click the '+' button)
Use the painting tools to create an icon for the scrambled
gameboard. Keep your design simple so it will work at a small size and with
few colors.
Experiment with lower bit depths (=fewer colors, smaller
file size):
- Save your document so that you have a backup to revert to.
- At the bottom of the toolbox attached to the Paint palette, find the
bit depth indicator (it will likely say "16 bits" or "8 bits") and double-click
it.
- In the "Transform Bitmap" dialog that appears, select a new (lower) setting
from the "Color Depth" pop-up menu. Click "Transform". A warning appears
because this transformation cannot be undone--click 'OK' to proceed.
- If you don't like the result, immediately use File-->Revert. Otherwise,
see if repeating the process wth an even lower bit depth will still yield
acceptable results.
Drag the cast member to the score, in a frame 1 channel
after the
game piece cells (the exact channel number does not matter in this case).
Reposition and/or resize the button on the stage so that it does not block
the view of
game pieces.
Experiment with colorizing your button (this works best
at 1 or 2 bits):
- Use the Window menu to display the Tool Palette.
- Click on the button sprite to select it on the stage.
- Click and hold on the color swatches at the bottom of the Tool Palette
to select new foreground and background colors.
Select the button in the cast window, then click on
the script button at the top-right of the window to attach a script to the
cast member. The Script window will open with a blank new script. Enter the
following:
on mouseUp
  global gSquareList, gScrambleRepeats
  repeat with counter = 1 to gScrambleRepeats
    -- invoke the move handler for randomly selected square
    movePiece getAt(gSquareList, random(count(gSquareList)))
  end repeat
end
Verify and close the script.
| return to outline |
Create button to reset the gamepieces
This button will be very similar to the previous one.
You could duplicate the 'Scramble' cast member (use Edit-->Duplicate),
then make the necessary modifications.
Follow the directions above for the creation of this
button's bitmap cast member, or modify the copy of the previous button.
When done, attach to the new cast member the following
script (if you started from a copy of another cast member, make sure
to delete the old script first):
on mouseUp
  global gSquareList, gNumberOfSquares, gSquaresPerRow
  global gHoleColumn, gHoleRow
  repeat with counter= 1 to count(gSquareList)
    -- invoke the setPicture handler for each square with
    -- the default cast member number
    setPicture getAt(gSquareList, counter), counter
  end repeat
  -- initialize missing gamepiece position to be the last Square
  put (gNumberOfSquares-1) mod gSquaresPerRow+1 into gHoleColumn
  put (gNumberOfSquares-1)/gSquaresPerRow+1 into gHoleRow
end
Verify and close the script.
Drag the cast member to an available channel after the
game piece cells in frame 1 of the score (the exact channel again is
unimportant).
Reposition/resize the button on the stage as needed.
| return to outline |
Create button and text to display help
This step requires both a bitmap cast member for the button,
and a text cast member for the help display. Note that the text sprite must
be in a specific channel for the scripts to work:
Follow the previous instructions to create the bitmap
cast member for the button. The icon for the button should indicate that
a help message will be displayed (the most widely used symbol for this is
a question mark).
Attach the following script to the new cast member:
on mouseUp
  global gHelpSprite
  set the visible of sprite gHelpSprite to not the visible of sprite gHelpSprite
end
Notice that there are only four lines in this script. The third one
is rather long and it may have wrapped if the web browser's window is not wide
enough--make sure it is entered as a single line in Director.
- Verify and close the script.
- File-->Preferences-->General. Set the text units to 'Pixels', then
click 'OK'.
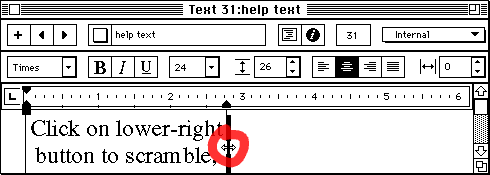
- Use Insert-->Media Element-->Text to open the text window with
a blank new cast member and enter the instructions for the operation of the
game:
Drag the new text cast member to channel 47, frame
1 of the score.
- If you intend to change this channel assignment, make sure to update
the value of the
gHelpSprite global in the
startMovie handler.
- Placing the text sprite in a high-number channel ensures that it will
still appear in front of other elements if additions are made to the layout.
While the text sprite is still selected on the stage,
drag its handles to resize it (or use Modify-->Sprite-->Properties
and enter the desired size and location).
- If necessary, you can modify the text directly on the stage by
double-clicking the sprite (the anti-aliasing is turned off while the text
is editable).
- To make type formatting changes on the stage, use the Text Inspector
(Window-->Inspectors-->Text).
Drag the bitmap cast member for the button to
the score, after the
game piece cells in frame 1 (any channel will do).
Reposition/resize the button on the stage as needed.
| return to outline |
Create button and text to display credits
The starting point for these two elements can be duplicates
of the previous two, though the text cast member in this case will likely
be smaller.
Follow the directions above for the bitmap cast member
for the button. This time the icon should indicate that info about the author
of the game will be provided (in HyperCard, this is often done with
a speech balloon icon).
Attach the following script to the new bitmap cast member:
on mouseUp
  global gCreditsSprite
  set the visible of sprite gCreditsSprite to not the visible of sprite gCreditsSprite
end
Notice again that there are only four lines in this script. The third
one may wrap on multiple lines if the web browser's window is not
wide enough--make sure it is entered as a single line in Director.
- Drag the new bitmap cast member to
the score, after the
game piece cells in frame 1 (any channel is OK).
Reposition/resize the button on the stage as needed.
- Follow the drections above to create the text cast member.
- Enter your name and contact info (an e-mail address generally works
best).
- To make this smaller text stand out more, you can experiment with different
colors: while the text window is open, use the foreground and background
color swatches in the tool palette.
Attach the following script to the new text cast member:
on mouseUp
  global gCreditsSprite
  set the visible of sprite gCreditsSprite to FALSE -- hide me
end
Drag the new text cast member to channel 48, frame
1 of the score.
- Again, if you want to use a different channel, the change needs to
be reflected in the value of the
gCreditsSprite global in the
startMovie handler.
Drag/resize as needed on the stage. To allow for simpler
scripts, make sure that the new sprite does not overlap the help sprite.
| return to outline |
Import sounds to highlight game events
Director for Macintosh will import sounds of types AIFF
and
System 7 'snd ' (only the 'snd ' resources can be in compressed format,
and only for Macintosh playback).
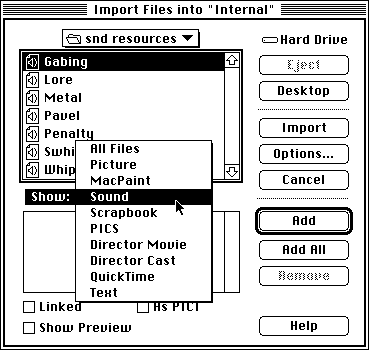
File-->Import. In the dialog, uncheck 'Linked',
and make sure that the 'Show' pop-up menus indicates 'All Files' or 'Sounds'.
Find and select the file containing the sound you want to use, and click
'Import'.

The new sound appears in the cast window. Select its name
in the Cast Member Name field at the top of the window, then use
Edit-->Copy Text.
In the on startMovie handler, find the global
variable that corresponds to the event highlighted by this sound, and change
its value by pasting in the name of the sound.
gFrameSnd holds the name of the sound played when the
user clicks on the frame of the game board.
gNoMoveSnd plays when the user clicks on a game piece that
cannot move.
gMoveSndList is a list of sound names, one of which is
selected
randomly to play when the user clicks on a game piece that can move.
- The scripts are designed to accommodate any number of sounds in this
list--but of course the more the sounds the bigger the file size.
Repeat the process for additional sounds.
| return to outline |
Modify scripts to play imported sounds
No new handlers are needed, but two of the existing ones
must be modified to replace plain beeps with the sounds you imported.
Find the click handler in
SquareParentScript (again, you can use the
Edit-->Find-->Handler command).
Edit the text so that the entire handler reads:
on click me
  global gNoMoveSnd, gMoveSndList
  if pieceCanMove(me) then
    -- play a randomly selected sound
    puppetSound getAt(gMoveSndList, random(count(gMoveSndList)))
    -- invoke the move handler for this same object
    movePiece me
  else
    puppetSound gNoMoveSnd -- bad choice
  end if
end
Note that the other handlers in this script need not be changed.
Find the gameClick handler in the gameplay
movie script.
Edit the text so that the entire handler reads:
on gameClick whichSprite
  --this handler responds to user input based on the part
  --of the game board clicked
  global gSquareChannelStart, gSquareList
  global gFrameSnd
  if whichSprite < gSquareChannelStart then
    puppetSound gFrameSnd -- that's the frame of the gameboard!
  else
    --find which Square location was clicked
    put whichSprite - gSquareChannelStart + 1 into position
    --tell the Square to respond to the click
    click getAt(gSquareList, position)
  end if
end
- Make sure that the scripts are correct, then close the script window.
| return to outline |
Use the Afterburner Xtra to convert to
Shockwave for Director format
The cmmands used in this step of the project will only
be available if the Shockwave XTras are properly installed.
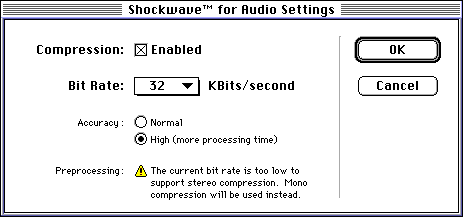
Xtras-->Shockwave for Audio Settings. In the dialog,
choose the following settings, then click
'OK':

- Turn on the checkbox to enable compression.
- Choose the lowest figure for Kbits/sec from the Bit Rate menu. This will
turn off stereo compression--which is just fine for our project.
- Choose the Accuracy you prefer. Gven the small size of the sounds involved,
High Accuracy shouldn't take much longer than Normal.
File-->Save and Compact.
Xtras-->Afterburner. You will be prompted for a filename:
type it in, then click 'Save'.
- The filename must end with the extension ".dcr" to be properly recognized
by Web servers and browsers as a Shockwave for Director file.
- To avoid problems with non-Macintosh computers, make sure to use only
letters, numbers and underscores (no spaces or special characters).
The file created by Afterburner can be referenced
from an HTML Web page using the following tag:
<EMBED SRC="somename.dcr" HEIGHT="heightInPixels" WIDTH="widthInPixels">
where the actual name and size of your movie replace the italicized
placeholders.
| return to outline |
Copyright by
Sandro Corsi.
Last modified 17 OCT 96.


