Computer Graphics Survey
Importing and Formatting Text
Using PageMaker 6.0 on MacOS Computers
|
previous handout |
ACG Home |
Instructor Home |
Class Home |
list of tutorials |
next handout |
Before beginning the project
If you are working in the ACG Lab
click to read these important notes before you start the tutorial.
This section of the directions contains information that pertains specifically to the way the ACG Lab operates. It may not apply if you work on the project elsewhere.
- Adobe PageMaker is one of the two most widely used page layout programs (the other one being QuarkXPress). It now has a successor, called InDesign, which may eventually replace it. PageMaker was first released by the Aldus corporation in the summer of 1985, marking the beginning of desktop publishing. Adobe purchased Aldus in 1995 and in recent upgrades added several tools for
electronic publishing, besides updating the traditional print media features. This is especially useful for people looking to repurpose existing material for the World-Wide Web.
- For our project, after some
preliminary set-up, we will use PageMaker to
import text from the previous session's files. As you progress, you may also want to
edit text already entered.
- In preparation for features to be added in the next session, we will break off each section of our text into a separate type block.
- Next we would define the style sheets we intend to use. In this case, we'll simply add to the document a set of styles compatible with web standards, provided with PageMaker.
- Then, we will apply the style sheets to the text of the document, thus formatting it in a web-compatible manner.
- Finally, we will conclude the session by terminating PageMaker and backing up our work.
- In later project sessions, we will use the electronic publishing additions to create the HTML skeleton of a web page incorporating the text we entered.
return to top
- Start up (or wake up) the computer.
- If the computer was sleeping, it will be immediately ready to work. To ensure that enough memory is available, use the icon menu at the very end of the menu bar, on the right (Application Menu) to check that only the 'Finder' is running.
- If other programs appear in the Application Menu, you can choose their names in turn to activate them, then use the Quit command in their File menu to terminate them.
- Create a folder on the desktop for your work.
- Insert your Zip disk in the drive.
- When the Zip disk icon appears on the desktop, double-click it to open it.
- Find the icon for the text file you created using SimpleText during the previous session.
- Drag the text file icon and drop it on the icon of your folder on the desktop.
- After the file has been copied from the Zip disk to your folder on the desktop, eject the Zip disk by dragging its icon to the Trash.
- Find and launch the program PageMaker.

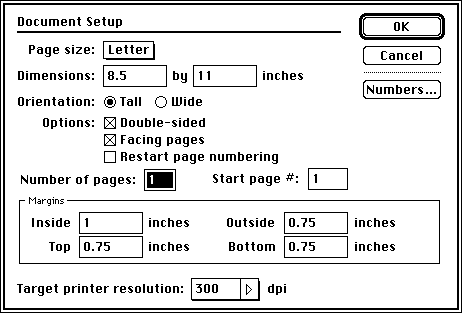
- Use the File-->New command to create a blank new document. You can leave the Document Setup settings at the default values (shown in this picture), then click OK.
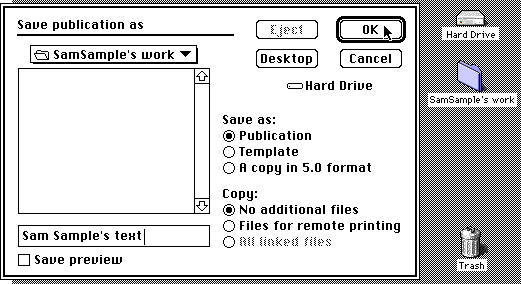
- Immediately save your document to your folder on the desktop, using the menu command File-->Save.
- Remember to use File-->Save on a regular basis to protect your work.
return to top
- Use the File-->Place command to display a standard 'Open' dialog box.
- Make sure the scrolling list in the dialog box shows the contents of your folder on the desktop. If not, use the controls in the dialog box to take you there.
- Once you find the entry for your text file in the scrolling list, open it by double-clicking on its icon.
- The 'Open' dialog box is removed from the screen, and a second dialog box appears. Make sure only 'No conversion, import as is' and 'Macintosh text file (ASCII)' are checked. Click OK.
- You are returned to your document, and the pointer changes from an arrow to a 'text block' symbol.
- Drag to draw a box within the document window. This creates a text column--a portion of the page where you can put type.
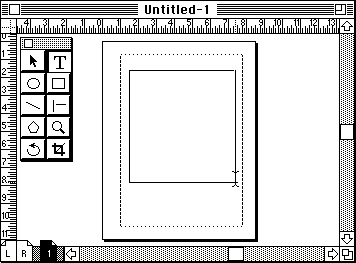
- The box disappears as soon as you release the mouse button. The contents of the text file you selected appear on the page.
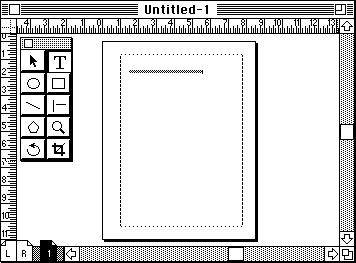
- Notice that the type is very small. It is so small that PageMaker replaces it with a grey bar (called greeking) instead of wasting time rendering type you could not read anyway. To be able to read your type, change the display magnification using Layout-->View-->Actual Size.
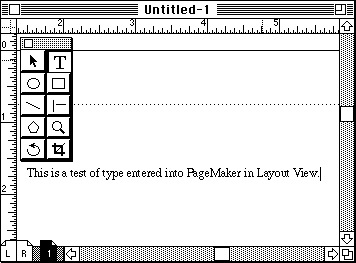
- To be able to select and modify your text, choose the the Text tool by clicking on its icon in the Toolbox (it's the icon marked with a capital 'T'). If the Toolbox is not on the screen, display it by choosing it in the Window menu.

- You are currently looking at the Layout View of your PageMaker document. For more convenient text entry and/or editing, switch to the Story Editor by clicking the Text tool anywhere in your text, then using Edit-->Edit Story.
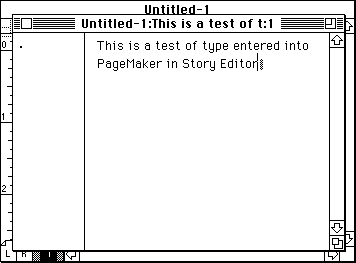
- You can return to the Layout View at any time by closing the Story Editor window.
- The story Editor also makes available commands to check spelling and to search and replace text (both in the Utilities menu).
- Now examine the text you just imported:
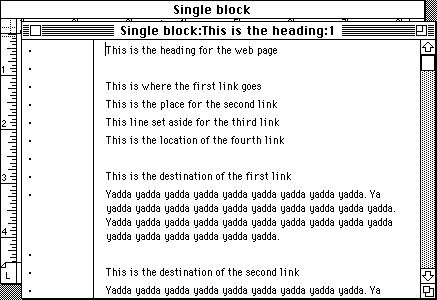
- Check that the structure of your text will work as a web page. You will want to have a table of contents at the top, indicating the main topics you cover in the body of the page. Each line of the table of contents will be later linked to a section of the page.
- If you find that you need to modify what you typed, do it now to avoid extra work later. The following section of this handout will tell you which commands you might want to use.
return to top
- Selecting Text
- In general, Macintosh software requires that you first select an item (such as a piece of text); then use a menu command or tool to alter the selected item.
- The simplest way to select text is to drag the Text tool over it:
- If you are in Layout view, make sure the Text ('T') tool is selected in the Toolbox (in the Story Editor, the Text tool is always active).
- Click and hold the mouse button at the beginning of the text to be selected.
- While holding down the mouse button, move the pointer to the end of the text to be selected. Note that you don't have to drag across each line of text--you can simply drag down or up to your destination.
- Release the mouse button, leaving the text highlighted. Highlighting appears either as reverse type (white on black), or as a colored background for the type, depending on the settings in the Appearance control panel.
- A faster way to select specific text elements is through multiple clicks of the text tool:
- Virtually all programs support double-clicking on a word to select it (double-clicking is two clicks in rapid succession at the same location).
- Some programs will also support triple-, quadruple-, quintuple-clicking to select entire lines, paragraphs, or stories (a series of linked paragraphs).
- When selecting a very large amount of text (several pages), dragging while selecting can be very slow. Instead, use the Shift key to extend the selection:
- Click the mouse button at the beginning of the text to be selected.
- While pressing the Shift key, click the mouse button at the end of the text to be selected. All the text between the locations of the first and the second click will be highlighted.
- Shift-clicking can also be used to extend or reduce an existing selection.
- Erasing
- Once text is selected, it can be modified in various ways--including its total elimination by pressing the <Delete> key, or choosing Clear from the Edit menu.
- To delete characters to the left of the insertion point (flashing bar), also press the <Delete> key.
- To delete characters to the right of the insertion point, press the <Del> key, located above the cursor (arrow) keys. This is not supported by all programs, and not available on all keyboards.
- Replacing
- Select text to be replaced, then type replacement text.
- Moving and replicating
- The process of re-arranging text is commonly accomplished by cutting and pasting through the Clipboard.
- The first step in cut-and-paste involves placing the selected text on the Clipboard. This is accomplished by two commands found in the Edit menu: Cut and Copy.
- The difference between Cut and Copy is that the former removes the selection from its original location, while the latter leaves a copy behind.
- Once the text is on the Clipboard, you can reposition the insertion point by clicking at the new location with the Text tool. Finally, the Paste command in the Edit menu will retrieve the content of the clipboard and place it at the insertion point.
- Pasting does not remove the item from the Clipboard, so it can be pasted multiple times. However, any use of the Cut or Copy commands will displace whatever is currently on the Clipboard.
- Since the commands for cut-and-paste are used frequently, you might want to note their keyboard equivalents:
- Command-X for Cut
- Command-C for Copy
- Command-V for Paste
- These keyboard commands, as well as Command-Z for Undo, are standard across all Macintosh applications.
return to top
- We must resort to this workaround so that when we later create links within our web page they will work properly.
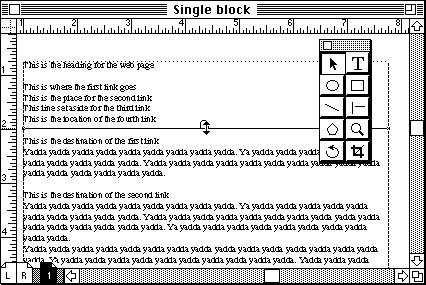
- To make room at the top of the page, use the arrow tool to select the text block, and drag down its top windowshade handle:
- PageMaker will shift the text down, leaving some empty space at the top of the page. Use the text ('T') tool to drag over the first part of your text, selecting it. Make sure to include the main heading and the entire table of contents, but leave out the body of the page.
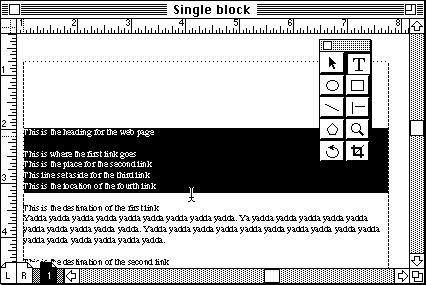
- Use the Edit-->Cut command to remove the selection and place it in temporary storage (the clipboard).
- Still using the text tool, draw a new text block in the top part of the page which you cleared earlier.
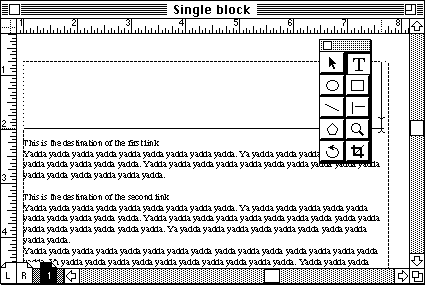
- When the flashing insertion bar appears at the top-left corner of the new text block, use the Edit-->Paste command to transfer to it your table of contents.
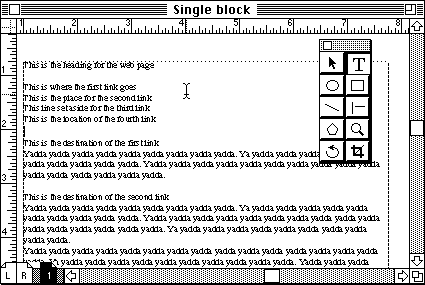
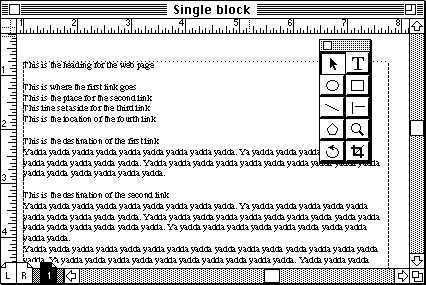
- To verify that the table of contents and the body of the page are indeed in separate blocks, choose the arrow tool, then use the Edit-->Select All command. The outlines of the two blocks should be displayed.
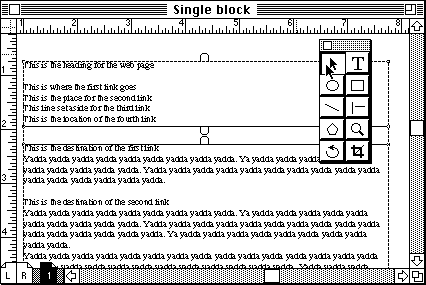
- Now repeat the same steps to break off each section of the body of the page into its own text box. Make sure that for each line in the table of contents there is a matching section in a separate block. Be careful to retain the correct top-to-bottom sequence for your text sections.
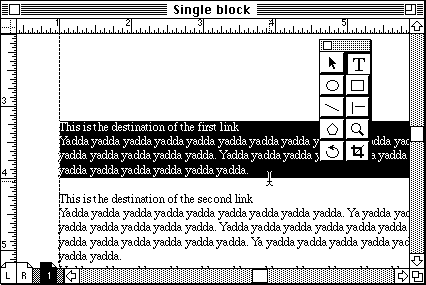
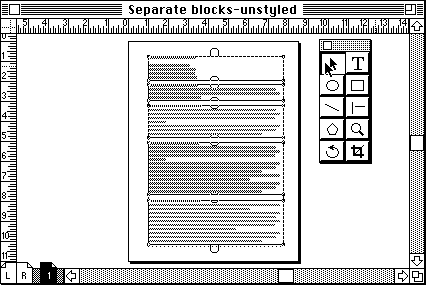
- After you are done separating all the sections, again choose the arrow tool and use Edit-->Select All to verify that all the blocks are in place:
return to top
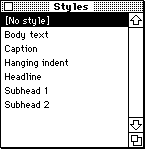
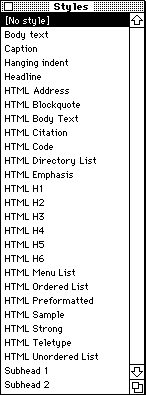
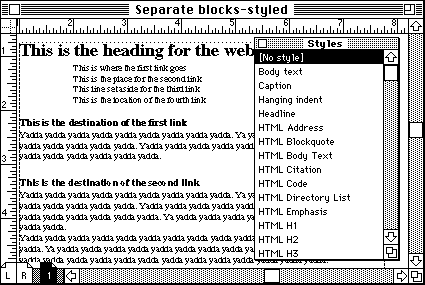
- Now we are ready to mark up our text. If the Styles palette is not on the screen, display it using the Window menu. It should list just a few default styles, as shown below:
- Use the Utilities-->PageMaker Plug-Ins-->HTML Author command. PageMaker will notify you that it is verifying your document: an error message might appear if you have created elements (such as boxes and circles), which will not export to the web file--just tell PageMaker to proceed. After completing verification, the HTML Author dialog box will appear:
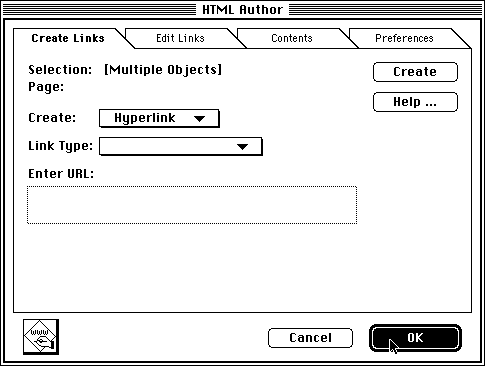
We will return to this dialog in the next session to complete the conversion to a web page. For now, click on the 'OK' button to let PageMaker know that you intend to mark up the document for the web. A message will appear saying that the appropriate style sheets are being added to your document.
- You should now see many more entries in the Styles palette, as shown at the end of this section of the handout.
- If--and only if--this did not happen (or if only a few styles were added), then you have been bitten by another PageMaker bug. The workaround is to import the same styles from another PageMaker document.
- Click on this link to download HTMLSTYL.PM. By default, the document will appear on the desktop of your computer--if you don't see a file named 'HTMLSTYL.PM', manually decompress 'HTMLSTYL.SIT' using the program StuffIt Expander.
- Use the command Type-->Define Styles.
- In the dialog, click 'Copy'.
- A standard Open File dialog appears: find the document 'HTMLSTYL.PM' and open it.
- This will add the HTML styles--if any warning dialogs appear, click to proceed.
- All of the style sheets with names that begin with "HTML" will translate to valid web page formats (as we'll see in the next session, HTML is the markup standard that makes web pages work with many different programs on a wide variety of computers).
return to top
- To apply the style sheets, use the text tool to select a portion of your type, then click on the name of the appropriate "HTML" style sheet in the Styles palette (make sure not to use any of the non-HTML styles). Notice that, because of a limitation in the way PageMaker style sheets work, only whole paragraphs can be marked up this way (you won't be able to mark up a word by itself without affecting the surrounding type).
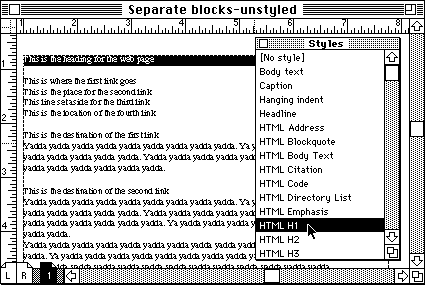
- Once the style sheet is applied, the type will be reformatted to show an approximation of the way it would look in a typical web page. Keep in mind, however, that the actual appearance of a web page is (and should be) partly outside the control of the designer.
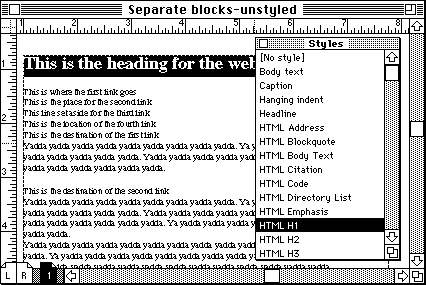
- Your choice of style sheets will depend on the relative emphasis you want to give to different parts of your text. In the example shown here, the main heading was marked as "HTML H1", the lines of the table of contents as "HTML Unordered List", the subheads at the beginning of each section as "HTML H3", and the rest as "HTML Body Text".
By following this link, you can see what the example page looks like in the browser you are using now.
return to top
- When done, make sure to save, then use File-->Quit to exit PageMaker.
- Copy to your Zip disks your PageMaker document, which will be needed again in the next session.
- To ward against possible accidents, make sure to have copies of each of your files on at least two disks.
- Shut down or send to sleep the computer.
return to top
Notes
- In the mid-80s, along with the introduction, at approximately the same time, of the Apple Macintosh and Adobe's PostScript page description language (incorporated in the original Apple LaserWriter), the program PageMaker gave impetus to the use of inexpensive computers for graphic design applications.
- The name Desktop Publishing (DTP) highlights the extensive control over the publishing workflow given to the designer, at his/her studio. In traditional publishing, the designer would use the services of many different businesses in the course of designing and producing a layout. This resulted in delays, increased costs, and fewer creative opportunities. As DTP evolved, more and more of these services were brought in-house and condensed into powerful programs such as PageMaker.
return
- Indicates the circulation of information as computer files. Instead of being printed and distributed on paper, text and graphics are output as HTML Web Pages, Acrobat Portable Documents, and other formats--and viewed directly on the computer screen.
- Some of the benfits deriving from this approach are:
- Much shorter lead time for revisions. In effect, the notion of periodic issues often disappears, as a web site can be updated on a continuous basis.
- Generally lower upfront costs. Economies of scale (large print runs) are no longer needed to bring down a unit cost which, for web page hits, is essentially negligible. Ease of workflow automation may also lower operating costs.
- Ease of customization of the final product, potentially yielding a unique experience for each individual user. Viewers themselves have extensive control over what they see and how they see it.
- Far-reaching circulation at little or no extra cost. A compact disc condenses reams of paper into a highly portable object. A web site automatically acquires a global reach.
- Greater variety of communication modes--besides text and still images, electronic publications can incorporate motion pictures, sound, three-dimensional simulations, and interactive elements.
- Against these benefits, electronic publishing still suffers from a relatively small potential audience--due to the equipment, skills, and access required of viewers. This small audience is often further fragmented by divergent industry standards.
return
- A workaround is how you get things done when the programs you use do not work as advertised--in this case, PageMaker's generation of links to other locations within the same page is faulty and will require us to do a bit of extra work.
return
- PageMaker text can be formatted either on a case-by-case basis, or by setting up a style sheet. In the first instance, you simply select a portion of text, then choose any one of several formatting commands available in the Type menu. This however means that any later formatting changes must be done the same way: selecting and modifying each portion of text individually.
- For greater efficiency, long publications are set up by defining the formatting rules beforehand in the style sheets. Afterwards, the type is selected and the appropriate style sheet is applied to it. Already at this initial stage there is a small saving of time because several formatting commands are replaced by a single style sheet application. The greater gain in time and effort occurs when revisions are requested: instead of selecting and re-formatting each text item, it is enough to redefine the style sheet, and automatically every text item it was applied to will be updated.
- For our project, we will use style sheets because they closely resemble the way web pages are defined, and in fact PageMaker requires them to be able to convert a publication into a web file.
return
- Besides cut-and-paste, several programs support drag-and-drop text editing as well.
- You can tell that drag-and-drop is available by placing the pointer on top of highlighted text: if the I-beam turns to an arrow, you can drag-and-drop the text selection.
- To move text with drag-and-drop, simply click and hold the mouse button when the arrow pointer is over the selected text, then drag to the new location. As the pointer moves, the insertion bar will move as well to indicate the exact location of dropped text. Release the mouse button to drop the text.
- To copy text with drag-and-drop, follow the same process described for moving, but keep the Option key pressed. Make sure to release the mouse button before releasing the Option key.
return
Information specific to the ACG Lab
- On ACG Lab computers, the program PageMaker is on the startup drive, inside the DTP folder.
- In the ACG Lab, documentation on PageMaker is on the ACG_DOCS volume of the ACG file server, inside the PageMaker folder:
- Select 'Chooser' from the Apple menu
- In the Chooser window, click on the 'AppleShare' icon on the left; double-click 'ACG' in the list of servers which appears on the right.
- Enter the name and password specified by the instructor in class; click 'OK'.
- Double-click 'ACG_DOCS' in the list of volumes; the icon for ACG_DOCS will appear on the desktop of your computer.
- Close the Chooser window.
- In the ACG Lab, a copy of the document "HTMLSTYL.PM" is in the class folder on the ACG_FILE volume of the ACG file server. Open the 'Class Materials' folder, then the 'Week 3' folder. To bring up ACG_FILE, follow the previous instructions to log on to the server, but choose ACG_FILE instead of ACG_DOCS from the list of volumes.
- Detailed instruction on all aspects of PageMaker's use is available through the Art Computer Graphics program of Fullerton College in the course ACG140-Desktop Publishing I.
- Besides the PageMaker class (ACG140), the Art Computer Graphics program of Fullerton College offers additional instruction in typesetting in ACG146-Desktop Publishing II, which covers in detail the program QuarkXPress.
- Look up these classes in the ACG Class Schedule.
return
|
previous handout |
return to top |
next handout |
|
This document originally at <http://acg2.fullcoll.edu/FACULTY/CORSI/LEARN/OVERVIEW/OV020MAC/INDEX.HTM>
|
Copyright 1998-2000 by Sandro Corsi.
Last modified 2000-08-28.
|
SaneDraw home
|